
Bridges-2 User Guide
Bridges-2 User Guide
We take security very seriously. Please take a minute now to read PSC policies on passwords, security guidelines, resource use, and privacy. You are expected to comply with these policies at all times when using PSC systems. If you have questions at any time, you can send email to help@psc.edu.
Are you new to HPC?
If you are new to high performance computing, please read Getting Started with HPC before you begin your research on Bridges-2. It explains HPC concepts which may be unfamiliar. You can also check the Introduction to Unix or the Glossary for quick definitions of terms that may be new to you.
We hope that that information along with the Bridges-2 User Guide will have you diving into your work on Bridges-2. But if you have any questions, don’t hesitate to email us for help at help@psc.edu.
Questions?
PSC support is here to help you get your research started and keep it on track. If you have questions at any time, you can send email to help@psc.edu.
Before you can connect to Bridges-2, you must have a PSC password.
If you have an active allocation on any other PSC system
PSC usernames and passwords are the same across all PSC systems. You will use the same username and password on Bridges-2 as for your other PSC allocation.
If you do not have an active allocation on any other PSC system:
You must create a PSC password. Go to the web-based PSC password change utility at apr.psc.edu to set your PSC password.
PSC password policies
Computer security depends heavily on maintaining secrecy of passwords.
PSC uses Kerberos authentication on all its production systems, and your PSC password (also known as your Kerberos password) is the same on all PSC machines.
Set your initial PSC password
When you receive a PSC account, go to the web-based PSC password change utility to set your password. For security, you should use a unique password for your PSC account, not one that you use for other sites.
Change your PSC password
Changing your password changes it on all PSC systems. To change your Kerberos password, use the web-based PSC password change utility .
PSC password requirements
Your password must:
- be at least eight characters long
- contain characters from at least three of the following groups:
- lower-case letters
- upper-case letters
- digits
- special characters, excluding apostrophes (') and quotes (")
- be different from the last three PSC passwords you have used
- not be re-used on other accounts
- remain private; it must not be shared with anyone
- be changed at least once per year
Password safety
Under NO circumstances does PSC reveal any passwords over the telephone, FAX them to any location, send them through email, set them to a requested string, or perform any other action that could reveal a password.
If someone claiming to represent PSC contacts you and requests information that in any manner would reveal a password, be assured that the request is invalid and do NOT comply.
It is strongly recommended to use a Password Manager to aid in generating secure passwords and managing accounts.
PSC policies regarding privacy, security and the acceptable use of PSC resources are documented here. Questions about any of these policies should be directed to PSC User Services.
See also policies for:
Security measures
Security is very important to PSC. These policies are intended to ensure that our machines are not misused and that your data is secure.
What you can do:
You play a significant role in security! To keep your account and PSC resources secure, please:
- Be aware of and comply with PSC’s policies on security, use and privacy found in this document
- Choose strong passwords and don’t share them between accounts or with others. More information can be found in the PSC password policies.
- Utilize your local security team for advice and assistance
- Keep your computer properly patched and protected
- Report any security concerns to the PSC help desk ASAP by calling the PSC hotline at: 412-268-4960 or email help@psc.edu
What we will never do:
- PSC will never send you unsolicited emails requesting confidential information.
- We will also never ask you for your password via an unsolicited email or phone call.
Remember that the PSC help desk is always a phone call away to confirm any correspondence at 412-268-4960.
If you have replied to an email appearing to be from PSC and supplied your password or other sensitive information, please contact the help desk immediately.
What you can expect:
- We will send you email when we need to communicate with you about service outages, new HPC resources, and the like.
- We will send you email when your password is about to expire and ask you to change it by using the web-based PSC password change utility.
Other security policies
- PSC password policies
- Users must connect to PSC machines using SSH in order to avoid remote logins with clear text passwords.
- HPN-SSH (High-Performance Networking SSH) is now the default implementation of SSH on Bridges-2 DTNs (Data Transfer Nodes).
- We vigilantly monitor our computer systems and network connections for security violations
- We are in close contact with the CERT Coordination Project with regard to possible Internet security violations
Reporting security incidents
To report a security incident you should contact our Hotline at 412-268-4960. To report non-emergency security incidents you can send email to help@psc.edu.
PSC acceptable use policy
PSC’s resources are vital to the scientific community, and we have a responsibility to ensure that all resources are utilized in a responsible manner. PSC has legal and other obligations to protect its services, resources, and the intellectual property of users. Users share this responsibility by observing the rules of acceptable use that are outlined in this document. Your on-line assent to this Acceptable Use Policy is your acknowledgment that you have read and understand your responsibilities as a user of PSC Services and Resources, which refers to all computers owned or operated by PSC and all hardware, data, software, storage systems and communications networks associated with these computers. If you have questions, please contact PSC User Services at 412-268-4960 or email help@psc.edu.
By using PSC Services and Resources associated with your allocation, you agree to comply with the following conditions of use:
- You will protect any access credentials (e.g., private keys, tokens & passwords) that are issued for your sole use by PSC and not knowingly allow any other person to impersonate or share any of your identities.
- You will not use PSC Services and Resources for any unauthorized purpose, including but not limited to:
- Financial gain
- Tampering with or obstructing PSC operations
- Breaching, circumventing administrative, or security controls
- Inspecting, modifying, distributing, or copying privileged data or software without proper authorization, or attempting to do so
- Supplying, or attempting to supply, false or misleading information or identification in order to access PSC Services and Resources
- You will comply with all applicable laws and relevant regulations, such as export control law or HIPAA.
- You will immediately report any known or suspected security breach or misuse of PSC access credentials to help@psc.edu.
- Use of PSC Services and Resources is at your own risk. There are no guarantees that PSC Services and Resources will be available, that they will suit every purpose, or that data will never be lost or corrupted. Users are responsible for backing up critical data.
- Logged information, including information provided by you for registration purposes, will be used solely for administrative, operational, accounting, monitoring and security purposes.
- Violations of this Acceptable Use Policy and/or abuse of PSC Services and Resources may result in loss of access to PSC Services and Resources. Abuse will be referred to the PSC User Services manager and/or the appropriate local, state and federal authorities, at PSC's discretion.
- PSC may terminate or restrict any user's access to PSC Services and Resources, without prior notice, if such action is necessary to maintain computing availability and security for other users of the systems.
- Allocations are awarded solely for open research, intended for publication. You will only use PSC Computing Resources to perform work consistent with the stated allocation request goals and conditions of use as defined by your approved PSC project and this Acceptable Use Policy.
- PSC is entitled to regulate, suspend or terminate your access, and you will immediately comply with their instructions.
Privacy
Pittsburgh Supercomputing Center is committed to preserving your privacy. This privacy policy explains exactly what information is collected when you visit our site and how it is used.
This policy may be modified as new features are added to the site. Any changes to the policy will be posted on this page.
- Any data automatically collected from our site visitors - domain name, browser types, etc. - are used only in aggregate to help us better meet site visitors' needs.
- There is no identification of individuals from our aggregate data. Therefore, unless you choose otherwise, you are totally anonymous when visiting our site.
- We do not share data with anyone for commercial purposes.
- If you choose to submit personally identifiable information to us electronically via the PSC feedback page, email, etc., we will treat it with the same respect for privacy afforded to mailed submissions. Submission of such information is always optional.
PSC respects individual privacy and takes great effort in supporting web site privacy policy outlined above. Please be aware, however, that we may publish URLs of other sites on our web site that may not adhere to the same policy.
To report a problem on Bridges-2, please email help@psc.edu. Please report only one problem per email; it will help us to track and solve any issues more quickly and efficiently.
Be sure to include
- an informative subject line
- your PSC username
If the question concerns a particular job, include these in addition:
- the JobID
- any error messages you received
- the date and time the job ran
- link to job scripts, output and data files
- the software being used, and versions when appropriate
- a screenshot of the error or the output file showing the error, if possible
Connecting to Bridges-2 Copy this link
Bridges-2 contains two broad categories of nodes: compute nodes, which handle the production research computing, and login nodes, which are used for managing files, submitting batch jobs and launching interactive sessions. Login nodes are not suited for production computing.
When you connect to Bridges-2, you are connecting to a Bridges-2 login node. You can connect to Bridges-2 via a web browser or through a command line interface.
See the Running Jobs section of this User Guide for information on production computing on Bridges-2.
Connect in a web browser
You can access Bridges-2 through a web browser by using the OnDemand software. You will still need to understand Bridges-2’s partition structure and the options which specify job limits, like time and memory use, but OnDemand provides a more modern, graphical interface to Bridges-2.
See the OnDemand section for more information.
Connect to a command line interface
You can connect to a traditional command line interface by logging in via SSH, using an SSH client from your local machine to connect to Bridges-2 using your PSC credentials.
SSH is a program that enables secure logins over an unsecure network. It encrypts the data passing both ways so that if it is intercepted it cannot be read.
SSH is client-server software, which means that both the user’s local computer and the remote computer must have it installed. SSH server software is installed on all the PSC machines. You must install SSH client software on your local machine.
- Free SSH clients for Macs, Windows machines, and many versions of Unix are available.
- HPN-SSH (High-Performance Networking SSH) is now the default implementation of SSH on Bridges-2 DTNs.
- HPN-SSH maximizes network throughput for data transfers over long-haul network connections for protocols that employ SSH for authentication and encryption, such as SFTP and rsync.
- Clients do not need to make any updates to enjoy improved performance.
- Clients may choose to take advantage of the additional performance offered by the dedicated HPN-SSH client.
- A command line version of SSH is installed on Macs by default; if you prefer that, you can use it in the Terminal application. You can also check with your university to see if there is an SSH client that they recommend. PSC recommends HPN-SSH.
Once you have an SSH client installed, you can use your PSC credentials to connect to Bridges-2. Note that you must create your PSC password before you can use SSH to connect to Bridges-2.
- Using your SSH client, such as HPN-SSH, connect to hostname bridges2.psc.edu using the default port (22).
- Enter your PSC username and password when prompted.
Read more about using SSH to connect to PSC systems
See the official HPN-SSH PSC docs site for more details.
Public-private keys
You can also use public-private key pairs to connect to Bridges-2. To do so, you must first fill out this form to register your keys with PSC.
Connect using Visual Studio Code
Researchers can run remote integrated development environments (IDEs) directly on allocated Bridges‑2 compute nodes using SSH-based IDE integrations such as Visual Studio Code (VS Code) Remote – SSH.
Learn more about launching remote IDEs on Bridges-2 compute nodes.
Allocation administration
There are two ways to change or reset your PSC password:
- Use the web-based PSC password change utility
- Use the kpasswd command when logged into a PSC system. Do not use the passwd command.
When you change your PSC password, whether you do it via the online utility or via the kpasswd command on one PSC system, you change it on all PSC systems.
The projects command will help you monitor your allocation on Bridges-2. You can determine what Bridges-2 resources you have been allocated, your remaining balance, your allocation id (used to track usage), and more. Typing projects at the command prompt will show all your allocation ids.
This user has two Bridges-2 allocations. The default allocation, abc000000p, includes the use of Bridges-2 Regular Memory and Bridges-2 GPU resources for computing and Bridges-2 Ocean for file storage. The second one, xyz000000p, includes the use of Bridges-2 Regular Memory nodes and Ocean for storage.

Accounting for Bridges-2 use varies with the type of node used, which is determined by the resources included in your allocation: “Bridges-2 Regular Memory”, for Bridges-2’s RSM (256 and 512GB) nodes); “Bridges-2 Extreme Memory”, for Bridges-2 4TB nodes; and “Bridges-2 GPU”, for Bridges-2’s GPU nodes.
For all resources and all node types, usage is defined in terms of “Service Units” or SUs. The definition of an SU varies with the type of node being used.
Bridges-2 Regular Memory
The RM nodes are allocated as “Bridges-2 Regular Memory”. This does not include Bridges-2’s GPU nodes. Each RM node has 128 cores, each of which can be allocated separately. Service Units (SUs) are defined in terms of “core-hours”: the use of one core for 1 hour.
1 core-hour = 1 SU
Because the RM nodes each hold 128 cores, if you use one entire RM node for one hour, 128 SUs will be deducted from your allocation.
128 cores x 1 hour =128 core-hours = 128 SUs
If you don’t need all 128 cores, you can use just part of an RM node by submitting to the RM-shared partition. See more about the partitions on Bridges-2 below.
Using the RM-shared partition, if you use 2 cores on a node for 30 minutes, 1 SU will be deducted from your allocation.
2 cores x 0.5 hours = 1 core-hour = 1 SU
Bridges-2 Extreme Memory
The 4TB nodes on Bridges-2 are allocated as “Bridges-2 Extreme Memory”. Accounting is done by the cores requested for the job. Service Units (SUs) are defined in terms of “core-hours”: the use of 1 core for one hour.
1 core-hour = 1 SU
If your job requests one node (96 cores) and runs for 1 hour, 96 SUs will be deducted from your allocation.
1 node x 96 cores/node x 1 hour = 96 core-hours = 96 SUs
If your job requests 3 nodes and runs for 6 hours, 1728 SUs will be deducted from your allocation.
3 nodes x 96 cores/node x 6 hours = 1728 core-hours = 1728 SUs
Bridges-2 GPU
Bridges-2 Service Units (SUs) for GPU nodes are defined in terms of “gpu-hours”: the use of one GPU Unit for one hour.
These nodes hold 8 GPU units each, each of which can be allocated separately. Service Units (SUs) are defined in terms of GPU-hours.
- For v100 nodes, 1 GPU-hour = 1 SU
- For l40s nodes, 1 GPU-hour = 1 SU
- For h100 nodes, 1 GPU-hour = 2 SU
If you use an entire v100 GPU node for one hour, 8 SUs will be deducted from your allocation. The equivalent usage of an entire h100 GPU node for one hour would deduct 16 SUs from your allocation.
- For v100 nodes: 8 GPU units/node x 1 node x 1 hour = 8 gpu-hours = 8 SUs
- For l40s nodes: 8 GPU units/node x 1 node x 1 hour = 8 gpu-hours = 8 SUs
- For h100 nodes: 8 GPU units/node x 1 node x 1 hour = 8 gpu-hours = 16 SUs
If you don’t need all 8 GPUs, you can use just part of a GPU node by submitting to the GPU-shared partition. See more about the partitions on Bridges-2 below.
If you use the GPU-shared partition and use 4 GPU units for 48 hours…
- For v100 nodes: 4 GPU units x 48 hours = 192 gpu-hours = 192 SUs deducted from your allocation
- For l40s nodes: 4 GPU units x 48 hours = 192 gpu-hours = 192 SUs deducted from your allocation
- For h100 nodes: 4 GPU units x 48 hours = 192 gpu-hours = 384 SUs deducted from your allocation
Every Bridges-2 allocation has storage allocation associated with it on the Bridges-2 file system, Ocean. There are no SUs deducted for the space you use, but if you exceed your storage quota, you will not be able to submit jobs to Bridges-2.
Each allocation has a Unix group associated with it. Every file is “owned” by a Unix group, and that file ownership determines which allocation is charged for the file space. See “Managing multiple allocations” for a further explanation of Unix groups, and how to manage file ownership if you have more than one allocation.
You can check your Ocean usage with the projects command.
If you have multiple allocations on Bridges-2, you should ensure that the work you do for each allocation is assigned correctly to that allocation. The files created under or associated with that allocation should belong to it, to make them easier to find and use by others on the same allocation.
There are two ids associated with each allocation for these purposes: a SLURM allocation id and a Unix group id. SLURM allocation ids determine which allocation your Bridges-2 (computational) use is deducted from. Unix group ids determine which allocation the storage space for files is deducted from, and who owns and can access files or directories.
For a given allocation, the SLURM allocation id and the Unix group id are identical strings.
One of your allocations has been designated as your default allocation, and the allocation id and Unix group id associated with that allocation are your default allocation id and default Unix group id. When a Bridges-2 job runs, any SUs it uses are deducted from the allocation it runs under. Any files created by that job are owned by the Unix group associated with that allocation.
Find your default allocation id and Unix group
To find your SLURM allocation ids, use the projects command. It will display all the allocations that you have. It will also list your default SLURM allocation id in the projects output at the top. Your default Unix group id is an identical string. In this example, the user has two allocations with SLURM allocation ids abc000000p and xyz000000p. The default allocation id is abc000000p.
Use a secondary (non-default) allocation
To use an allocation other than your default allocation on Bridges-2, you must specify the appropriate allocation id with the -A option to the SLURM sbatch command. See the Running Jobs section of this Guide for more information on batch jobs, interactive sessions and SLURM. NOTE that using the -A option does not change your default Unix group. Any files created during a job are owned by your default Unix group, no matter which allocation id is used for the job, and the space they use will be deducted from the Ocean allocation for the default Unix group.
Change your Unix group for a login session
To temporarily change your Unix group, use the newgrp command. Any files created subsequently during this login session will be owned by the new group you have specified. Their storage will be deducted from the Ocean allocation of the new group. After logging out of the session, your default Unix group will be in effect again.
newgrp unix-group
NOTE that the newgrp command has no effect on the allocation id in effect. Any Bridges-2 usage will be deducted from the default allocation id or the one specified with the -A option to sbatch.
Change your default allocation id and Unix group permanently
You can permanently change your default allocation id and your default Unix group id with the change_primary_group command. Type:
change_primary_group -l
to see all your groups. Then type
change_primary_group account-id
to set account-id as your default.
Your default allocation id changes immediately. Bridges-2 use by any batch jobs or interactive sessions following this command are deducted from the new account by default.
Your default Unix group does not change immediately. It takes about an hour for the change to take effect. You must log out and log back in after that window for the new Unix group to be the default.
Tracking your usage
There are several ways to track your Bridges-2 usage: the projects command and the Grant Management System.
The projects command shows information on all Bridges-2 allocations, including usage and the Ocean directories associated with the allocation.
For more detailed accounting data you can use the Grant Management System. You can also track your usage through the ACCESS Allocations Portal. Be aware that the Grant Management System may not reflect the status of an ACCESS project renewal request.
Managing your ACCESS allocation
Most account management functions for your ACCESS allocation are handled through the ACCESS Allocations Portal. See the Manage Allocations tab for your usage. Be sure to check the RAMPS/Policies FAQ page for answers for many common questions.
The change_shell command allows you to change your default shell. This command is only available on the login nodes.
To see which shells are available, type
change_shell -l
To change your default shell, type
change_shell newshell
where newshell is one of the choices output by the change_shell -l command. You must log out and back in again for the new shell to take effect.
The policies documented here are evaluated regularly to assure adequate and responsible administration of PSC systems for users. As such, they are subject to change at any time.
PSC provides storage resources, for long-term storage and file management.
Files in a PSC storage system are retained for 3 months after the affiliated allocation has expired.
When appropriate, PSC provides refunds for jobs that failed due to circumstances beyond your control.
To request a refund, contact a PSC consultant or email help@psc.edu. In the case of batch jobs, we require the standard error and output files produced by the job. These contain information needed in order to refund the job.
There are several distinct file spaces available on Bridges-2, each serving a different function.
- $HOME, your home directory on Bridges-2
- $PROJECT, persistent file storage on Ocean. $PROJECT is a larger space than $HOME.
- $LOCAL, Scratch storage on local disk on the node running a job
- $RAMDISK, Scratch storage in the local memory associated with a running job
See PSC polices for user accounts for information about file expiration for allocations using Bridges-2.
Access to files in any Bridges-2 space is governed by Unix file permissions. If your data has additional security or compliance requirements, please contact compliance@psc.edu.
Unix file permissions
For detailed information on Unix file protections, see the man page for the chmod (change mode) command.
To share files with your group, give the group read and execute access for each directory from your top-level directory down to the directory that contains the files you want to share.
chmod g+rx directory-name
Then give the group read and execute access to each file you want to share.
chmod g+rx filename
To give the group the ability to edit or change a file, add write access to the group:
chmod g+rwx filename
Access Control Lists
If you want more fine-grained control than Unix file permissions allow —for example, if you want to give only certain members of a group access to a file, but not all members—then you need to use Access Control Lists (ACLs). Suppose, for example, that you want to give janeuser read access to a file in a directory, but no one else in the group.
Use the setfacl (set file acl) command to give janeuser read and execute access on the directory:
setfacl -m user:janeuser:rx directory-name
for each directory from your top-level directory down to the directory that contains the file you want to share with janeuser. Then give janeuser access to a specific file with
setfacl -m user:janeuser:r filename
User janeuser will now be able to read this file, but no one else in the group will have access to it.
To see what ACLs are set on a file, use the getfacl (get file acl) command.
There are man pages for chmod, setfacl and getfacl.
$HOME
This is your Bridges-2 home directory. It is the usual location for your batch scripts, source code and parameter files. Its path is /jet/home/username, where username is your PSC username. You can refer to your home directory with the environment variable $HOME. Your home directory is visible to all of Bridges-2’s nodes.
Your home directory is backed up daily, although it is still a good idea to store copies of your important files in another location, such as the Ocean file system or on a local file system at your site. If you need to recover a home directory file from backup send email to help@psc.edu. The process of recovery will take 3 to 4 days.
$HOME quota
Your home directory has a 25GB quota. You can check your home directory usage using the my_quotas command. To improve the access speed to your home directory files you should stay as far below your home directory quota as you can.
File expiration
See PSC polices for user accounts for information about file expiration for allocations using Bridges-2.
$PROJECT
$PROJECT is persistent file storage. It is larger than your space in $HOME. Be aware that $PROJECT is NOT backed up.
The path of your Ocean home directory is /ocean/projects/groupname/PSC-username, where groupname is the Unix group id associated with your allocation and PSC–username is your PSC username. Use the id command to find your group name.
The command id -Gn will list all the Unix groups you belong to.
The command id -gn will list the Unix group associated with your current session.
If you have more than one allocation, you will have a $PROJECT directory for each allocation. Be sure to use the appropriate directory when working with multiple allocations.
File expiration
See PSC polices for user accounts for information about file expiration for allocations using Bridges-2.
$PROJECT quota
Storage quota
Your usage quota for each of your allocations is the amount of Ocean storage you received when your proposal was approved. If your total use in Ocean exceeds this quota you won’t be able to run jobs on Bridges-2 until you are under quota again.
Use the my_quotas or projects command to check your Ocean usage.
If you have multiple allocations, it is very important that you store your files in the correct $PROJECT directory.
Inode quota
In order to best serve all Bridges-2 users, an inode quota has been established for $PROJECT. It will be enforced in addition to the storage quota for your allocation. The inode quota is proportional to the size of your storage quota, and is set at 6070 inodes per GB of storage allocated. There is currently no inode quota on home directories in the Jet file system.
Inodes are data structures that contain metadata about a file, such as the file size, user and group ids associated with the file, permission settings, time stamps, and more. Each file has at least one inode associated with it.
To view your usage on Bridges-2, use the my_quotas command which shows your limits as well as your current usage.
[user@bridges2-login013 ~]$ my_quotas
The quota for project directory /ocean/projects/abcd1234
Storage quota: 9.766T
 Storage used: 1.384T
 Inode quota: 60,700,000
 Inodes used: 453,596
Tips to reduce your inode usage:
- Delete files which are no longer needed
- Combine small files into one larger file via tools such as zip or tar
Should you need to increase your storage quota or inode limit, please submit a supplement request via the ACCESS allocation system. If you have questions, please email help@psc.edu.
$LOCAL
Each of Bridges-2’s nodes has a local file system attached to it. This local file system is only visible to the node to which it is attached, and provides fast access to local storage.
In a running job, this file space is available as $LOCAL.
If your application performs a lot of small reads and writes, then you could benefit from using this space.
Node-local storage is only available when your job is running, and can only be used as working space for a running job. Once your job finishes, any files written to $LOCAL are inaccessible and deleted. To use local space, copy files to it at the beginning of your job and back out to a persistent file space before your job ends.
If a node crashes all the node-local files are lost. You should checkpoint theses files by copying them to Ocean during long runs.
$LOCAL size
The maximum amount of local space varies by node type.
To check on your local file space usage type:
du -sh
No Service Units accrue for the use of $LOCAL.
Using $LOCAL
To use $LOCAL you must first copy your files to $LOCAL at the beginning of your script, before your executable runs. The following script is an example of how to do this
RC=1
 n=0
 while [[ $RC -ne 0 && $n -lt 20 ]]; do
     rsync -aP $sourcedir $LOCAL/
     RC=$?
     let n = n + 1
     sleep 10
 done
Set $sourcedir to point to the directory that contains the files to be copied before you call your executable. This code will try at most 20 times to copy your files. If it succeeds, the loop will exit. If an invocation of rsync was unsuccessful, the loop will try again and pick up where it left off.
At the end of your job you must copy your results back from $LOCAL or they will be lost. The following script will do this.
mkdir $PROJECT/results
 RC=1
 n=0
 while [[ $RC -ne 0 && $n -lt 20 ]]; do
     rsync -aP $LOCAL/ $PROJECT/results
     RC=$?
     let n = n + 1
     sleep 10
 done
This code fragment copies your files to a directory in your Ocean file space named results, which you must have created previously with the mkdir command. It will loop at most 20 times and stop if it is successful.
$RAMDISK
You can use the memory allocated for your job for IO rather than using disk space. In a running job, the environment variable $RAMDISK will refer to the memory associated with the nodes in use.
The amount of memory space available to you depends on the size of the memory on the nodes and the number of nodes you are using. You can only perform IO to the memory of nodes assigned to your job.
If you do not use all of the cores on a node, you are allocated memory in proportion to the number of cores you are using. Note that you cannot use 100% of a node’s memory for IO; some is needed for program and data usage.
This space is only available to you while your job is running, and can only be used as working space for a running job. Once your job ends this space is inaccessible and files there are deleted. To use $RAMDISK, copy files to it at the beginning of your job and back out to a permanent space before your job ends. If your job terminates abnormally, files in $RAMDISK are lost.
Within your job you can cd to $RAMDISK, copy files to and from it, and use it to open files. Use the command du -sh to see how much space you are using.
If you are running a multi-node job the $RAMDISK variable points to the memory space on the node that is running your rank 0 process.
Several methods are available to transfer files into and from Bridges-2.
Note: File transfers can no longer be initiated from the Bridges-2 login nodes.
- File transfers should use the Data Transfer Nodes (DTN): data.bridges2.psc.edu
- The DTNs are specifically built to be high-speed data connectors.
- All file transfers must be initiated from your local machine using the DTN nodes.
- Using the DTNs prevents file transfers from disrupting interactive use on Bridges-2’s login nodes.
Paths for Bridges-2 file spaces
To copy files into any of your Bridges-2 spaces, you need to know the path to that space on Bridges-2. The start of the full paths for your Bridges-2 directories are:
Home directory /jet/home/PSC–username
Ocean directory /ocean/projects/groupname/PSC-username
where PSC-username is your PSC username and groupname is the Unix group id associated with your allocation. To find your groupname, use the command id -Gn. All of your valid groupnames will be listed. You have an Ocean directory for each allocation you have.
Transfers into your Bridges-2 home directory
Your home directory quota is 25GB. More space is available in your $PROJECT file space in Ocean. Exceeding your home directory quota will prevent you from writing more data into your home directory and will adversely impact other operations you might want to perform.
Commands to transfer files
You can use rsync, scp, sftp or Globus to copy files to and from Bridges-2.
rsync
You can use the rsync command to copy files to and from Bridges-2. Always use rsync from your local machine, whether you are copying files to Bridges-2 from your local machine, or copying files to your local machine from Bridges-2.
A sample rsync command to copy a file from your local machine to a Bridges-2 directory is
rsync -rltpDvp -e 'ssh -l PSC-username' source_directory data.bridges2.psc.edu:target_directory
A sample rsync command to copy a file from Bridges-2 to your local machine is
rsync -rltpDvp -e 'ssh -l PSC-username' data.bridges2.psc.edu:source_directory target_directory
Notes:
- In both cases, substitute your username for ‘username‘.
- Make sure you use the correct groupname in your target directory.
- If you are using HPN-SSH as your client, substitute “hpnssh” instead of “ssh” in those commands.
- By default, rsync will not copy older files with the same name in place of newer files in the target directory — It will overwrite older files.
We recommend the rsync options -rltDvp. See the rsync man page for information on these options and other options you might want to use. We also recommend the option
-oMACS=umac-64@openssh.com
If you use this option, your transfer will use a faster data validation algorithm.
You may want to put your rsync command in a loop to insure that it completes. A sample loop is
RC=1
 n=0
 while [[ $RC -ne 0 && $n -lt 20 ]] do
     rsync source-file target-file
     RC = $?
     let n = n + 1
     sleep 10
 done
This loop will try your rsync command 20 times. If it succeeds it will exit. If an rsync invocation is unsuccessful the system will try again and pick up where it left off. It will copy only those files that have not already been transferred. You can put this loop, with your rsync command, into a batch script and run it with sbatch.
scp
To use scp for a file transfer you must specify a source and destination for your transfer. The format for either source or destination is
username@machine-name:path/filename
For transfers involving Bridges-2, username is your PSC username. Use data.bridges2.psc.edu for the machine-name. This is the name for the Data Transfer Node, a high-speed data connector at PSC. We recommend using it for all file transfers using scp involving Bridges-2. Using it prevents file transfers from disrupting interactive use on Bridges-2’s login nodes.
File transfers using scp must specify full paths for Bridges-2 file systems. See Paths for Bridges-2 file spaces for details.
sftp
To use sftp, first connect to the remote machine:
sftp username@machine-name
When Bridges-2 is the remote machine, use your PSC username as username. The Bridges-2 machine-name should be specified as data.bridges2.psc.edu. This is the name for the Data Transfer Nodes (DTN), a high-speed data connector at PSC. We recommend using it for all file transfers using sftp involving Bridges-2. Using it prevents file transfers from disrupting interactive use on Bridges-2’s login nodes.
You will be prompted for your password on the remote machine. If Bridges-2 is the remote machine, enter your PSC password.
You can then enter sftp subcommands, like put to copy a file from the local system to the remote system, or get to copy a file from the remote system to the local system.
To copy files into Bridges-2, you must either cd to the proper directory or use full pathnames in your file transfer commands. See Paths for Bridges-2 file spaces for details.
Globus
Globus can be used for any file transfer to Bridges-2. It tracks the progress of the transfer and retries when there is a failure; this makes it especially useful for transfers involving large files or many files.
To use Globus to transfer files you must authenticate either via a Globus account or with InCommon credentials.
To use a Globus account for file transfer, set up a Globus account at the Globus site.
To use InCommon credentials to transfer files to/from Bridges-2, you must first provide your ePPN information to PSC. Follow these steps:
- Find your ePPN
- Navigate to https://cilogon.org/ in your web browser.
- Select your institution from the Select an Identity Provider list.
- Click the Log On button. You will be taken to the web login page for your institution.
- Login with your username and password for your institution.
- If your institution has an additional login requirement (e.g., Duo), authenticate that as well.
- After successfully authenticating to your institution’s web login interface, you will be returned to the CILogon webpage.
- Click the User Attributes drop down link to find the ‘ePPN’.
- Send your ePPN to PSC
- From the User Attributes dropdown on the CILogon webpage, select and copy the ePPN text field, typically formated like an e-mail address, with an account name @ some domain. If your CILogon User Attributes ePPN is blank, please let us know.
- Email help@psc.edu, pasting your copied ePPN into the message. Ask that the ePPN be mapped to your PSC username for GridFTP data transfers.
Your CILogon information will be added within one business day, and you will be able to begin transferring files to and from Bridges-2.
Globus endpoints
Once you have the proper authentication you can initiate file transfers from the Globus site. A Globus transfer requires a Globus endpoint, a file path and a file name for both the source and destination.
When using Globus GridFTP for data transfers to/from Bridges-2, please select the endpoint labelled: “PSC Bridges-2 /ocean and /jet filesystems”.
These endpoints are owned by psc@globusid.org. You must always specify a full path for the Bridges-2 file systems. See Paths for Bridges-2 file spaces for details.
You can transfer files from a Bridges-2 allocation that is expiring to a new allocation by moving files to a directory belonging to the new allocation and changing the file ownership.
Move the files to a new directory
Use the mv, rsync, or scp commands to move files from one directory to another.
To move a file from a directory test in the $PROJECT directory of your expiring allocation to directory previous-results of of your $PROJECT space under your new allocation, type:
mv /ocean/projects/old-groupid/PSC-username/test/file1 /ocean/projects/new-groupid/PSC-username/previous-results/file1
If you are in the test directory of the expiring allocation, the command may be simplified to
mv file1 /ocean/projects/new-groupid/PSC-username/previous-results/file1
Note that this will remove the file from your expiring allocation’s file space, rather than make a copy.
See the Transferring Files section of this User Guide for information on the rsync and scp commands.
Change the file ownership
You must also change the Unix group of any files moved into a different allocation’s file space in order to access them under the new allocation. Use the chgrp command to do this. Type:
chgrp new-group filename
To change the group ownership of an entire directory, type:
chgrp -R new-group directory-name
See the Managing Multiple Allocations section of this User Guide for an explanation of allocation ids and Unix groups and how to find them.
Bridges-2 provides a rich programming environment for the development of applications.
C, C++ and Fortran
AMD (AOCC), Intel, Gnu and NVIDIA HPC compilers for C, C++ and Fortan are available on Bridges-2. Be sure to load the module for the compiler set that you want to use. Once the module is loaded, you will have access to the compiler commands:
| Compiler command for | ||||
|---|---|---|---|---|
| Module name | C | C++ | Fortran | |
| AMD | aocc | clang | clang++ | flang |
| Intel | intel | icc | icpc | ifort |
| Intel (LLVM) | intel-oneapi | icx | icpx | ifx |
| Gnu | gcc | gcc | g++ | gfortran |
| NVIDIA | nvhpc | nvcc | nvc++ | nvfortran |
Compiler options
AMD provides a Compiler Options Quick Reference Guide for AMD, Gnu and Intel compilers on their EPYC processors.
There are man pages for each of the compilers.
See also:
- AMD Optimizing C/C++ Compiler (AOCC)
- NVIDIA compilers web site
- GNU compilers web site
- Module documentation for information on what modules are available and how to use them.
OpenMP programming
To compile OpenMP programs you must add an option to your compile command:
| Compiler | Option |
|---|---|
| Intel | -qopenmp for example: icc -qopenmp yprog.c |
| Intel (LLVM) | -fopenmp OR -qopenmp for example: icx -fopenmp yprog.c Check ifx -help or icx -help for more details |
| Gnu | -fopenmp for example: gcc -fopenmp myprog.c |
| NVIDIA | -mp for example: nvcc -mp myprog.c |
See also:
MPI programming
Three types of MPI are supported on Bridges-2: MVAPICH2, OpenMPI and Intel MPI. The three MPI types may perform differently on different problems or in different programming environments. If you are having trouble with one type of MPI, please try using another type. Contact help@psc.edu for more help.
To compile an MPI program, you must:
- load the module for the compiler that you want
- load the module for the MPI type you want to use – be sure to choose one that uses the compiler that you are using. The module name will distinguish between compilers.
- issue the appropriate MPI wrapper command to compile your program
To run your previously compiled MPI program, you must load the same MPI module that was used in compiling.
To see what MPI versions are available, type module avail mpi or module avail mvapich2. Note that the module names include the MPI family and version (“openmpi/4.0.2”), followed by the associated compiler and version (“intel20.4”). (Modules for other software installed with MPI are also shown.)
Wrapper commands
| To use the Intel compilers with | Load an intel module plus | Compile with this wrapper command | ||
|---|---|---|---|---|
| C | C++ | Fortran | ||
| Intel MPI | intelmpi/version-intelversion |
mpiicc note the “ii” |
mpiicpc note the “ii” |
mpiifort note the “ii” |
| Intel MPI (LLVM) |
intel-oneapi/version-intelversion Note: Loading intel-oneapi will also load all the dependencies. |
mpiicx note the “ii” |
mpiicpx note the “ii” |
mpiifx OR mpiifort -fc=ifx note the “ii” |
| OpenMPI | openmpi/version-intelversion | mpicc | mpicxx | mpifort |
| MVAPICH2 | mvapich2/version-intelversion | mpicc code.c -lifcore | mpicxx code.cpp -lifcore | mpifort code.f90 -lifcore |
| To use the Gnu compilers with | Load a gcc module plus | Compile with this command | ||
|---|---|---|---|---|
| C | C++ | Fortran | ||
| OpenMPI | openmpi/version-gccversion | mpicc | mpicxx | mpifort |
| MVAPICH2 | mvapich2/version-gccversion | mpicc | mpicxx | mpifort |
| To use the NVIDIA compilers with | Load an nvhpc module plus | Compile with this command | ||
|---|---|---|---|---|
| C | C++ | Fortran | ||
| OpenMPI | openmpi/version-nvhpcversion | mpicc | mpicxx | mpifort |
| MVAPICH2 | Not available | |||
Custom task placement with Intel MPI
If you wish to specify custom task placement with Intel MPI (this is not recommended), you must set the environment variable I_MPI_JOB_RESPECT_PROCESS_PLACEMENT to 0. Otherwise the mpirun task placement settings you give will be ignored. The command to do this is:
For the BASH shell:
export I_MPI_JOB_RESPECT_PROCESS_PLACEMENT=0
For the CSH shell:
setenv I_MPI_JOB_RESPECT_PROCESS_PLACEMENT 0
See also:
- Intel MPI web site
- MVAPICH2 web site
- OpenMPI web site
- Module documentation for information on what modules are available and how to use them.
Other languages
Other languages, including Java, Python, R, and MATLAB, are available. See the software page for information.
Debugging and performance analysis
DDT is a debugging tool for C, C++ and Fortran 90 threaded and parallel codes. It is client-server software. Install the client on your local machine and then you can access the GUI on Bridges-2 to debug your code.
See the DDT page for more information.
Collecting performance statistics
In order to collect performance statistics, you must use the -C PERF option to the sbatch command. Note that this can only be done in RM partitions in which jobs do not share a node with other jobs: RM and RM-512 partitions. See the sbatch section of this User Guide for more information on the options available with the sbatch command.
(VS Code Example)
Researchers can run remote integrated development environments (IDEs) directly on allocated Bridges‑2 compute nodes using SSH-based IDE integrations such as Visual Studio Code (VS Code) Remote – SSH.
This approach ensures that IDE server processes and development workloads execute on dedicated compute resources rather than shared login nodes.
Running remote IDE sessions on compute nodes:
- Improves performance and responsiveness (dedicated resources)
- Provides significantly improved interactive experience
- Enables unrestricted file transfers (
rsync, scp) - Ensures full network bandwidth (fast download speeds)
- Aligns with PSC usage policies and best practices
Running remote IDE sessions on login nodes introduces slowness due to shared resource contention.
Overview
The setup described here:
- Uses SSH configuration to automatically request a compute node via
salloc - Connects the IDE directly to the allocated node
- Ensures all compute and file activity happens off the login nodes
While this guide uses VS Code, the same pattern applies to:
- JetBrains Gateway / PyCharm
- Other SSH-based IDEs
- Terminal-based workflows
1. Prepare SSH Access
Windows Users (Recommended)
Configure SSH key-based authentication or an SSH agent to avoid repeated password prompts.
- PSC documentation:
https://www.psc.edu/about-using-ssh/ (“Authenticating using a public-private key pair”) - Security note: Ensure your private key is securely stored if using passwordless authentication.
You may use:
- OpenSSH Authentication Agent (built-in Windows service)
- Any compatible SSH agent
- Security note: Ensure your computer is secure and only you can use it.
macOS / Linux Users
No SSH key setup is required, as the provided SSH configuration uses connection multiplexing:
None
ControlMaster auto
ControlPath ...
This allows SSH sessions to be reused, meaning authentication is only required once per session, or at least not as often.
2. Install VS Code Remote SSH Extension
Install and open Visual Studio Code, then:
- Open the Extensions panel
- Search for Remote – SSH
- Click Install
This installs:
- Remote – SSH
- Remote – SSH: Editing Configuration Files
- Remote Explorer
These components enable:
- Managing SSH configurations
- Connecting to remote systems
- Running a VS Code server over SSH
3. Configure SSH Endpoints
Open the Command Palette (F1) and select Remote-SSH: Open SSH Configuration File.
Choose your local SSH config file:
- macOS/Linux:
/Users/USERNAME/.ssh/config - Windows:
C:\Users\USERNAME\.ssh\config
Add the following configuration, replacing USERNAME
macOS / Linux
Host bridges2 b2
  ControlMaster auto
  ControlPath $HOME/.ssh/master-%r@%h:%p
  HostName bridges2.psc.edu
  User USERNAME

Host vscode-rm
  ForwardAgent yes
  StrictHostKeyChecking no
  ProxyCommand ssh bridges2 "/usr/bin/salloc --job-name=Interact
   --partition RM-small,RM-shared /bin/bash -c 'nc \$SLURM_NODELIST 22'"
  User USERNAME

Host vscode-v100
  ForwardAgent yes
  StrictHostKeyChecking no
  ProxyCommand ssh bridges2 "/usr/bin/salloc --job-name=Interact
   --partition=GPU-small,GPU-shared --gpus=v100:1 /bin/bash -c 'nc \$SLURM_NODELIST 22'"
  User USERNAME

Host vscode-h100
  ForwardAgent yes
  StrictHostKeyChecking no
  ProxyCommand ssh bridges2 "/usr/bin/salloc --job-name=Interact
   --gres=gpu:h100-80:1 --partition=GPU-shared /bin/bash -c 'nc \$SLURM_NODELIST 22'"
  User USERNAME
Windows
Compared to above, the main differences are not escaping the dollar sign ($) in $SLURM_NODELIST, and the “Control” features not being available (to avoid typing in your password so often).
Host bridges2 b2
    HostName bridges2.psc.edu
    User USERNAME

Host vscode-rm
   ForwardAgent yes
   StrictHostKeyChecking no
   ProxyCommand ssh bridges2 "/usr/bin/salloc --job-name=Interact
    --partition RM-small,RM-shared /bin/bash -c 'nc $SLURM_NODELIST 22'"
   User USERNAME

Host vscode-v100
   ForwardAgent yes
   StrictHostKeyChecking no
   ProxyCommand ssh bridges2 "/usr/bin/salloc --job-name=Interact
    --partition=GPU-small,GPU-shared --gpus=v100:1 /bin/bash -c 'nc $SLURM_NODELIST 22'"
   User USERNAME

Host vscode-h100
   ForwardAgent yes
   StrictHostKeyChecking no
   ProxyCommand ssh bridges2 "/usr/bin/salloc --job-name=Interact
    --gres=gpu:h100-80:1 --partition=GPU-shared /bin/bash -c 'nc $SLURM_NODELIST 22'"
  User USERNAME
4. Connect to a Compute Node
In VS Code:
- Open Remote Explorer
- Select one of the following hosts:
-
vscode-rm→ Regular Memory node (Bridges-2 RM)vscode-v100→ V100 GPU node (Bridges-2 GPU)vscode-h100→ H100 GPU node (Bridges-2 GPU)
Important note:
|
Do not directly connect using: These point to login nodes and will result in:
|
5. How It Works
The SSH configuration automates the full connection flow:
- SSH connects to the login node (
bridges2). - A compute node is allocated via (
salloc). - The connection is tunneled using (
nc) (netcat). - The IDE attaches directly to the compute node.
- Use the IDE as usual.
Bridges-2 Remote IDE Connection Flow:

Once connected, the IDE runs entirely on the compute node, including:
- Editor backend (VS Code server)
- Terminal sessions
- File operations
- Development workloads
Extending to Other IDEs
This setup is not specific to VS Code.
Any IDE that supports SSH-based remote execution can reuse the same SSH configuration:
- JetBrains Gateway / PyCharm
- CLI-based environments
- Other remote development tools
To adapt:
- Use the same vscode-* SSH hosts
- Configure the IDE to connect via SSH
- Ensure the IDE runs its backend on the remote host
Bridges-2 has a broad collection of applications installed. See the list of software installed on Bridges-2.
Typing bioinformatics on Bridges-2 will list all of the biological science software that is installed .
PSC has built some environments which provide a rich, unified, Anaconda-based environment for AI, Machine Learning, and Big Data applications. Each environment includes several popular AI/ML/BD packages, selected to work together well. See the section on AI software environments in this User Guide for more information.
Additional software may be installed by request. If you feel that you need particular software for your research, please send a request to help@psc.edu.
All production computing must be done on Bridges-2's compute nodes, NOT on Bridges-2's login nodes. The SLURM scheduler (Simple Linux Utility for Resource Management) manages and allocates all of Bridges-2's compute nodes. Several partitions, or job queues, have been set up in SLURM to allocate resources efficiently.
To run a job on Bridges-2, you need to decide how you want to run: interactively, in batch, or through OnDemand; and where to run - that is, which partitions you are allowed to use.
What are the different ways to run a job?
You can run jobs in Bridges-2 in several ways:
- interactive sessions - where you type commands and receive output back to your screen as the commands complete
- batch mode - where you first create a batch (or job) script which contains the commands to be run, then submit the job to be run as soon as resources are available
- through OnDemand - a browser interface that allows you to run interactively, or create, edit and submit batch jobs and also provides a graphical interface to tools like RStudio, Jupyter notebooks, and IJulia, More information about OnDemand is in the OnDemand section of this user guide.
Regardless of which way you choose to run your jobs, you will always need to choose a partition to run them in.
Which partitions can I use?
Different partitions control different types of Bridges-2's resources; they are configured by the type of node they control, along with other job requirements like how many nodes or how much time or memory is needed. Your access to the partitions is based on the resources included in your Bridges-2 allocation: "Bridges-2 Regular Memory", "Bridges-2 Extreme Memory", or “Bridges-2 GPU". Your allocation may include more than one resource; in that case, you will have access to more than one set of partitions.
You can see which of Bridges-2's resources that you have been allocated with the projects command. See section "The projects command" in the Account Administration section of this User Guide for more information.
You can do your production work interactively on Bridges-2, typing commands on the command line, and getting responses back in real time. But you must be allocated the use of one or more Bridges-2's compute nodes by SLURM to work interactively on Bridges-2. You cannot use Bridges-2's login nodes for your work.
You can run an interactive session in any of the RM or GPU partitions. You will need to specify which partition you want, so that the proper resources are allocated for your use.
Note
You cannot run an interactive session in the EM partition.
If all of the resources set aside for interactive use are in use, your request will wait until the resources you need are available. Using a shared partition (RM-shared, GPU-shared) will probably allow your job to start sooner.
To start an interactive session, use the command interact. The format is:
interact -options
The simplest interact command is
interact
This command will start an interactive job using the defaults for interact, which are
Partition: RM-shared
Cores: 1
Time limit: 60 minutes
If you want to run in a different partition, use more than one core, multiple nodes, or set a different time limit, you will need to use options to the interact command. See the Options for interact section of this User Guide below.
Once the interact command returns with a command prompt you can enter your commands. The shell will be your default shell. When you are finished with your job, type CTRL-D.
[user@bridges2-loginr01 ~]$ interact
A command prompt will appear when your session begins
"Ctrl+d" or "exit" will end your session
[user@r004 ~]
Notes:
- Be sure to use the correct allocation id for your job if you have more than one allocation. See "Managing multiple allocations".
- Service Units (SU) accrue for your resource usage from the time the prompt appears until you type CTRL-D, so be sure to type CTRL-D as soon as you are done.
- The maximum time you can request is 8 hours. Inactive interact jobs are logged out after 30 minutes of idle time.
- By default,
interactuses the RM-shared partition. Use the-poption for interact to use a different partition.
If you want to run in a different partition, use more than one core or set a different time limit, you will need to use options to the interact command. Available options are given below.
| Option | Description | Default value |
|---|---|---|
-p partition |
Partition requested | RM-small |
-t HH:MM:SS |
Walltime requested The maximum time you can request is 8 hours. |
60:00 (1 hour) |
-N n This is only valid for the RM, RM-512 and GPU partitions |
Number of nodes requested | 1 |
--ntasks-per-node=n Note the "--" for this option |
Number of cores to allocate per node | 1 |
-n NTasks
|
Number of tasks spread over all nodes | N/A |
--gres=gpu:type:n Note the "--" for this option |
Specifies the type and number of GPUs requested. Valid choices for 'type' are v100-16, v100-32, l40s-48, and h100-80. See the GPU partitions section of this User Guide for an explanation of the GPU types. Valid choices for 'n' are 1-8 |
N/A |
-A allocation-id |
SLURM allocation id for the job Find or change your default allocation id Note: Files created during a job will be owned by the Unix group in effect when the job is submitted. This may be different than the allocation id for the job. See the discussion of the |
Your default allocation id |
-R reservation-name |
Reservation name, if you have one Use of -R does not automatically set any other interact options. You still need to specify the other options (partition, walltime, number of nodes) to override the defaults for the interact command. If your reservation is not assigned to your default account, then you will need to use the -A option when you issue your interact command. |
N/A |
-h |
Help, lists all the available command options | N/A |
See also
- Bridges-2 partitions
- How to determine your valid SLURM allocation ids and Unix groups and change your default, in the Account Adminstration section of this User Guide
- Managing multiple allocations
- The
sruncommand, for more complex control over your interactive job
Instead of working interactively on Bridges-2, you can instead run in batch. This means you will
- create a file called a batch or job script
- submit that script to a partition (queue) using the
sbatchcommand - wait for the job's turn in the queue
- if you like, check on the job's progress as it waits in the partition and as it is running
- check the output file for results or any errors when it finishes
A simple example
This section outlines an example which submits a simple batch job. More detail on batch scripts, the sbatch command and its options follow.
Create a batch script
Use any editor you like to create your batch scripts. A simple batch script named hello.job which runs a "hello world" command is given here. Comments, which begin with '#', explain what each line does.
The first line of any batch script must indicate the shell to use for your batch job.
#!/bin/bash
# use the bash shell
set -x
# echo each command to standard out before running it
date
# run the Unix 'date' command
echo "Hello world, from Bridges-2!"
# run the Unix 'echo' command
Submit the batch script to a partition
Use the sbatch command to submit the hello.job script.
[joeuser@login005 ~]$ sbatch hello.job
Submitted batch job 7408623
Note the jobid that is echoed back to you when the job is submitted. Here it is 7408623.
Check on the job progress
You can check on the job's progress in the partition by using the squeue command. By default you will get a list of all running and queued jobs. Use the -u option with your PSC username to see only your jobs. See the squeue command for details.
[joeuser@login005 ~]$ squeue -u joeuser
 JOBID   PARTITION NAME     USER    ST TIME NODES NODELIST(REASON)
 7408623 RM        hello.jo joeuser PD 0:08 1     r7320:00
The status "PD" (pending) in the output here shows that job 7408623 is waiting in the queue. See more about the squeue command below.
When the job is done, squeue will no longer show it:
[joeuser@login005 ~]$ squeue -u joeuser
 JOBID PARTITION NAME USER ST TIME NODES NODELIST(REASON)
Check the output file when the job is done
By default, the standard output and error from a job are saved in a file with the name slurm-jobid.out, in the directory that the job was submitted from.
[joeuser@login005 ~]$ more slurm-7408623.out
+ date
Sun Jan 19 10:27:06 EST 2020
+ echo 'Hello world, from Bridges-2!'
Hello world, from Bridges-2!
[joeuser@login005 ~]$
To submit a batch job, use the sbatch command. The format is
sbatch -options batch-script
The options to sbatch can either be in your batch script or on the sbatch command line. Options in the command line override those in the batch script.
Note:
- Be sure to use the correct allocation id if you have more than one allocation. Please see the -A option for sbatch to change the SLURM allocation id for a job. Information on how to determine your valid allocation ids and change your default allocation id is in the Account adminstration section of this User Guide.
- In some cases, the options for sbatch differ from the options for interact or srun.
- By default, sbatch submits jobs to the RM partition. Use the -p option for sbatch to direct your job to a different partition
For more information about these options and other useful sbatch options see the sbatch man page.
| Option | Description | Default |
|---|---|---|
-p partition |
Partition requested | RM |
-t HH:MM:SS |
Walltime requested in HH:MM:SS | 30 minutes |
-N n |
Number of nodes requested. | 1 |
-n n |
Number of cores requested in total. | None |
--ntasks-per-node=n Note the "--" for this option |
Request n cores be allocated per node. | 1 |
-o filename |
Save standard out and error in filename. This file will be written to the directory that the job was submitted from. | slurm-jobid.out |
--gpus=type:n Note the "--" for this option |
Specifies the number of GPUs requested. 'type' specifies the type of GPU you are requesting. Valid types are v100-16, v100-32, l40s-48, and h100-80. See the GPU partitions section of this User Guide for information on the GPU types. 'n' is the total number of GPUs requested for this job. |
N/A |
-A allocation-id |
SLURM allocation id for the job. If not specified, your default allocation id is used. Find your default SLURM allocation id. Note: Files created during a job will be owned by the Unix group in effect when the job is submitted. This may be different than the allocation id used by the job. See the discussion of the |
Your default allocation id |
-C constraints |
Specifies constraints which the nodes allocated to this job must satisfy. Valid constraints are:
See the discussion of the -C option in the sbatch man page for more information. |
N/A |
--res reservation-name Note the "--" for this option |
Use the reservation that has been set up for you. Use of --res does not automatically set any other options. You still need to specify the other options (partition, walltime, number of nodes) that you would in any sbatch command. If your reservation is not assigned to your default account then you will need to use the -A option to sbatch to specify the account. | N/A |
--mail-type=type Note the "--" for this option |
Send email when job events occur, where type can be BEGIN, END, FAIL or ALL. | N/A |
--mail-user=PSC-username Note the "--" for this option |
User to send email to as specified by -mail-type. Default is the user who submits the job. | N/A |
-d=dependency-list |
Set up dependencies between jobs, where dependency-list can be:
|
N/A |
--no-requeue Note the "--" for this option |
Specifies that your job will be not be requeued under any circumstances. If your job is running on a node that fails it will not be restarted. Note the "--" for this option. | N/A |
--time-min=HH:MM:SS Note the "--" for this option. |
Specifies a minimum walltime for your job in HH:MM:SS format. SLURM considers the walltime requested when deciding which job to start next. Free slots on the machine are defined by the number of nodes and how long those nodes are free until they will be needed by another job. By specifying a minimum walltime you allow the scheduler to reduce your walltime request to your specified minimum time when deciding whether to schedule your job. This could allow your job to start sooner. If you use this option your actual walltime assignment can vary between your minimum time and the time you specified with the -t option. If your job hits its actual walltime limit, it will be killed. When you use this option you should checkpoint your job frequently to save the results obtained to that point. |
N/A |
-h |
Help, lists all the available command options |
See also
- Bridges-2 partitions
- How to determine your valid allocation ids and change your defaults, in the Account administration section of this User Guide
- Managing multiple allocations
Managing multiple allocations
If you have more than one allocation, be sure to use the correct SLURM allocation id and Unix group when running jobs.
See "Managing multiple allocations" in the Account Administration section of this User Guide to see how to find your allocation ids and Unix groups and determine or change your defaults.
Permanently change your default SLURM allocation id and Unix group
See the change_primary_group command in the "Managing multiple allocations" in the Account Administration section of this User Guide to permanently change your default SLURM allocation id and Unix group.
Temporarily change your SLURM allocation id or Unix group
See the -A option to the sbatch or interact commands to set the SLURM allocation id for a specific job.
The newgrp command will change your Unix group for that login session only. Note that any files created by a job are owned by the Unix group in effect when the job is submitted, which is not necessarily the same as the allocation id used for the job. See the newgrp command in the Account Administration section of this User Guide to see how to change the Unix group currently in effect.
Each SLURM partition manages a subset of Bridges-2's resources. Each partition allocates resources to interactive sessions, batch jobs, and OnDemand sessions that request resources from it.
Not all partitions may be open to you. The resources included in your Bridges-2 allocations determine which partitions you can submit jobs to.
An allocation including "Bridges-2 Regular Memory" allows you to use Bridges-2's RM (256 and 512GB) nodes. The RM, RM-shared and RM-512 partitions handle jobs for these nodes.
An allocation including "Bridges-2 Extreme Memory" allows you to use Bridges-2’s 4TB EM nodes. The EM partition handles jobs for these nodes.
An allocation including "Bridges-2 GPU" allows you to use Bridges-2's GPU nodes. The GPU and GPU-shared partitions handle jobs for these nodes.
All the partitions use FIFO scheduling. If the top job in the partition will not fit, SLURM will try to schedule the next job in the partition. The scheduler follows policies to ensure that one user does not dominate the machine. There are also limits to the number of nodes and cores a user can simultaneously use. Scheduling policies are always under review to ensure best turnaround for users.
#!/bin/bash
#SBATCH -N 1
#SBATCH -p RM
#SBATCH -t 5:00:00
#SBATCH --ntasks-per-node=128

# type 'man sbatch' for more information and options
# this job will ask for 1 full RM node (128 cores) for 5 hours
# this job would potentially charge 640 RM SUs

#echo commands to stdout
set -x

# move to working directory
# this job assumes:
# - all input data is stored in this directory
# - all output should be stored in this directory
# - please note that groupname should be replaced by your groupname
# - PSC-username should be replaced by your PSC username
# - path-to-directory should be replaced by the path to your directory where the executable is

cd /ocean/projects/groupname/PSC-username/path-to-directory

# run a pre-compiled program which is already in your project space

./a.out
#!/bin/bash
#SBATCH -N 1
#SBATCH -p RM-shared
#SBATCH -t 5:00:00
#SBATCH --ntasks-per-node=64

# type 'man sbatch' for more information and options
# this job will ask for 64 cores in RM-shared and 5 hours of runtime
# this job would potentially charge 320 RM SUs

#echo commands to stdout
set -x

# move to working directory
# this job assumes:
# - all input data is stored in this directory
# - all output should be stored in this directory
# - please note that groupname should be replaced by your groupname
# - PSC-username should be replaced by your PSC username
# - path-to-directory should be replaced by the path to your directory where the executable is

cd /ocean/projects/groupname/PSC-username/path-to-directory

# run a pre-compiled program which is already in your project space

./a.out
Sample batch script for a job in the RM-512 partition
Sample batch script for a job in the RM-512 partition
#!/bin/bash
#SBATCH -N 1
#SBATCH -p RM-512
#SBATCH -t 5:00:00
#SBATCH --ntasks-per-node=128

# type 'man sbatch' for more information and options
# this job will ask for 1 full RM 512GB node (128 cores) for 5 hours
# this job would potentially charge 640 RM SUs

#echo commands to stdout
set -x

# move to working directory
# this job assumes:
# - all input data is stored in this directory
# - all output should be stored in this directory
# - please note that groupname should be replaced by your groupname
# - PSC-username should be replaced by your PSC username
# - path-to-directory should be replaced by the path to your directory where the executable is

cd /ocean/projects/groupname/PSC-username/path-to-directory

# run a pre-compiled program which is already in your project space

./a.out
Summary of partitions for Bridges-2 RM nodes
| RM | RM-shared | RM-512 | |
|---|---|---|---|
| Node RAM | 256GB | 256GB | 512GB |
| Node count default | 1 | NA Only one node per job is allowed in the RM-shared partition |
1 |
| Node count max | 64 | NA Only one node per job is allowed in the RM-shared partition |
2 |
| Core count default | 128 | 1 | 128 |
| Core count max | 6400 | 64 | 256 |
| Walltime default | 1 hour | 1 hour | 1 hour |
| Walltime max | 72 hours | 72 hours | 72 hours |
The EM partition should be used for allocations including “Bridges-2 Extreme Memory” .
Use the appropriate allocation id for your jobs: If you have more than one Bridges-2 allocation, be sure to use the correct SLURM allocation id for each job. See “Managing multiple allocations”.
For information on requesting resources and submitting jobs see the discussion of the interact or sbatch commands.
Jobs in the EM partition
- run on Bridges-2’s EM nodes, which have 4TB of memory and 96 cores per node
- can use at most one full EM node
- must specify the number of cores to use
- must use a multiple of 24 cores. A job can request 24, 48, 72 or 96 cores.
When submitting a job to the EM partition, you can request:
- the number of cores
- the walltime limit
Your job will be allocated memory in proportion to the number of cores you request. Be sure to request enough cores to be allocated the memory that your job needs. Memory is allocated at about 1TB per 24 cores. As an example, if your job needs 2TB of memory, you should request 48 cores.
If you do not specify the number of cores or time limit, you will get the defaults. See the summary table for the EM partition below for the defaults.
Note
You cannot submit an interactive job to the EM partition.You cannot use the EM partition through OnDemand.
Sample sbatch command for the EM partition
An example of a sbatch command to submit a job to the EM partition, requesting an entire node for 5 hours is
sbatch -p EM -t 5:00:00 --ntasks-per-node=96 myscript.job
where:
-p indicates the intended partition
-t is the walltime requested in the format HH:MM:SS
--ntasks-per-node is the number of cores requested per node
myscript.job is the name of your batch script
Sample job script for the EM partition
#!/bin/bash
#SBATCH -N 1
#SBATCH -p EM
#SBATCH -t 5:00:00
#SBATCH -n 96

# type 'man sbatch' for more information and options
# this job will ask for 1 full EM node (96 cores) and 5 hours of runtime
# this job would potentially charge 480 EM SUs

# echo commands to stdout
set -x

# move to working directory
# this job assumes:
# - all input data is stored in this directory
# - all output should be stored in this directory
# - please note that groupname should be replaced by your groupname
# - PSC-username should be replaced by your PSC username
# - path-to-directory should be replaced by the path to your directory where the executable is

cd /ocean/projects/groupname/PSC-username/path-to-directory

#run pre-compiled program which is already in your project space

./a.out
Summary of the EM partition
| EM partition | |
|---|---|
| Node | 96 cores/node 4TB/node |
| Node max | 1 |
| Core default | None |
| Core min | 24 |
| Core max | 96 |
| Walltime default | 1 hour |
| Walltime max | 120 hours (5 days) |
| Memory | 1TB per 24 cores |
Jobs in the GPU and GPU-shared partitions run on the GPU nodes and are available for allocations including "Bridges-2 GPU".
For information on requesting resources and submitting jobs see the interact or sbatch commands.
Use the appropriate allocation id for your jobs: If you have more than one Bridges-2 allocation, be sure to use the correct SLURM allocation id for each job. See “Managing multiple allocations”.
Jobs in the GPU partition can use more than one node. Jobs in the GPU partition do not share nodes, so jobs are allocated all the cores and all of the GPUs associated with the nodes assigned to them . Your job will incur SU costs for all of the cores on your assigned nodes. The memory space across nodes is not integrated. The cores within a node access a shared memory space, but cores in different nodes do not.
Jobs in the GPU-shared partition use only part of one node. Because SUs are calculated using how many gpus are used, using only part of a node will result in a smaller SU charge.
GPU types
Bridges-2 has four types of GPU nodes: h100-80, l40s-48, v100-32, and v100-16. The -80, -48, -32, or -16 in each type indicates the amount of GPU memory per GPU on the node. All node types can be used in all GPU partitions.
h100-80 nodes
- There are ten h100-80 nodes containing eight H100 GPUs, each with 80GB of GPU memory. These nodes have 2TB RAM per node.
l40s-48 nodes
- There are three l40s-48 nodes containing eight L40S GPUs, each with 48GB of GPU memory. These nodes have 1TB RAM per node.
v100-32 nodes
- There are 24 Tesla v100-32 nodes. Each has eight V100 GPUs and 32GB of GPU memory per GPU. These nodes have 512GB RAM per node.
- There is one DGX-2 node, with 16 V100 GPUs, each with 32GB of GPU memory. It has 1.5TB RAM.
v100-16 nodes
- There are 9 v100-16 nodes containing eight V100 GPUs, each with 16GB of GPU memory. These nodes have 192GB RAM per node.
The GPU partition
The GPU partition is for jobs that will use one or more entire GPU nodes.
When submitting a job to the GPU partition, you must use these options to specify the number of GPUs you want. Be aware that the way to request a number of GPUs is different, depending on whether you are using an interactive session or a batch job.
If you do not specify the number of GPUs or time limit, you will get the defaults. See the summary table for the GPU partitions below for the defaults.
Interactive sessions
Use a command like
interact -p GPU --gres=gpu:type:n
- In interactive use, n is the number of GPUs you are requesting per node. Because you always use one or more entire nodes in the GPU partition, n must always be either 8 or 16. To use the DGX-2, n must be 16. For all other GPU nodes, n must be 8.
- type is one of h100-80, l40s-48, v100-16, or v100-32
- Because there is only one DGX-2, you cannot request more than one node with -N when using asking for 16 GPUs (i.e., --gres=gpu:v100-32:16).
- Note: Users can no longer use Interact to request more than 1 node.
See interact command options for details on other options, such as the walltime limit.
Sample interact command for the GPU partition
An interact command to start a GPU job on 2 GPU v100-32 nodes for 30 minutes is
interact -p GPU --gres=gpu:v100-32:8 -t 30:00
where:
-p indicates the intended partition
--gres=gpu:v100-32:8 requests the use of 8 GPUs on each v100-32 node
-t 30:00 requests 30 minutes of walltime, in the format HH:MM:SS
Batch jobs
Use a command like
sbatch -p GPU --gpus=type:n -N x jobname
- In batch use, n is the total number of GPUs you are requesting for the job. Because you always use one or more entire nodes in the GPU partition, n must be a multiple of 8, either: 8, 16, 24 or 32, depending on how many nodes you are requesting. To use the DGX-2, use 16 for n and never ask for more than one node.
- type is one of "v100-16" or v100-32"
- x indicates the number of nodes you want to use, from 1-4. If you only want one node, you can omit the -N option because it defaults to one.
- Valid options to use one node are
- --gpus=h100-80:8 to use an H100-80 node
- --gpus=l40s-48:8 to use an L40S-48 node
- --gpus=v100-32:16 to use the DGX-2
- --gpus=v100-32:8, to use a V100-32 Tesla node
- --gpus=v100-16:8, to use a Volta node
- jobname is the name of your job script
See the sbatch command options for more details on available options, such as the walltime limit.
Sample sbatch command for the GPU partition
A sample sbatch command to submit a job to the GPU partition to use 2 full GPU v100-16 nodes and all 8 GPUs on each node for 5 hours is
sbatch -p GPU -N 2 --gpus=v100-16:16 -t 5:00:00 jobname
where:
-p indicates the intended partition
-N 2 requests two v100-16 GPU nodes
--gpus=v100-16:16 requests the use of all 8 GPUs on both v100-16 nodes, for a total of 16 for the job
-t is the walltime requested in the format HH:MM:SS
jobname is the name of your batch script
Sample job script for the GPU partition
#!/bin/bash
#SBATCH -N 1
#SBATCH -p GPU
#SBATCH -t 5:00:00
#SBATCH --gpus=v100-32:8

#type 'man sbatch' for more information and options
#this job will ask for 1 full v100-32 GPU node(8 V100 GPUs) for 5 hours
#this job would potentially charge 40 GPU SUs

#echo commands to stdout
set -x

# move to working directory
# this job assumes:
# - all input data is stored in this directory
# - all output should be stored in this directory
# - please note that groupname should be replaced by your groupname
# - PSC-username should be replaced by your PSC username
# - path-to-directory should be replaced by the path to your directory where the executable is

cd /ocean/projects/groupname/PSC-username/path-to-directory

#run pre-compiled program which is already in your project space

./gpua.out
#!/bin/bash
#SBATCH -N 1
#SBATCH -p GPU-shared
#SBATCH -t 5:00:00
#SBATCH --gpus=v100-32:4

#type 'man sbatch' for more information and options
#this job will ask for 4 V100 GPUs on a v100-32 node in GPU-shared for 5 hours
#this job would potentially charge 20 GPU SUs

#echo commands to stdout
set -x

# move to working directory
# this job assumes:
# - all input data is stored in this directory
# - all output should be stored in this directory
# - please note that groupname should be replaced by your groupname
# - PSC-username should be replaced by your PSC username
# - path-to-directory should be replaced by the path to your directory where the executable is

cd /ocean/projects/groupname/PSC-username/path-to-directory

#run pre-compiled program which is already in your project space

./gpua.out
Summary of partitions for GPU nodes
| GPU | GPU-shared | |
|---|---|---|
| Default number of nodes | 1 | NA |
| Max nodes/job | NA | |
| Default number of GPUs | 8 | 1 |
| Max GPUs/job | 64 | 4 |
| Default runtime | 1 hour | 1 hour |
| Max runtime | 48 hours | 48 hours |
Benchmarking jobs require using one or more entire nodes. Use the RM, RM-512 or GPU partitions to ensure that no other jobs can run on any of the nodes your benchmarking job is using.
Using the DGX-2 for benchmarking
To use the entire DGX-2 node, submit a job to the GPU partition requesting 16 v100-32 GPUs. Use a command like
sbatch -p GPU --gpus=v100-32:16 jobname
Add any other options, like walltime, that you need. See the section of this User Guide on sbatch options for descriptions of other available options.
Using other GPU nodes for benchmarking
To use the entire GPU node, submit a job to the GPU partition requesting 8 GPUs. Use a command like
sbatch -p GPU --gpus=v100-32:8 jobname
or
sbatch -p GPU --gpus=v100-16:8 jobname
depending on the type of GPU node you need.
Add any other options, like walltime, that you need. See the section of this User Guide on sbatch options for descriptions of other available options.
Using RM nodes for benchmarking
You can use either the RM or RM-512 partitions for benchmarking. Use a command like
sbatch -p RM jobname
or
sbatch -p RM-512 jobname
depending on how much memory you need.
Add any other options, like walltime, that you need. See the section of this User Guide on sbatch options for descriptions of other available options.
A Bridges-2 reservation dedicates nodes for your exclusive use for a specified time. So that the entire Bridges-2 community receives the best service possible, reservations are only granted for significant reasons. You will be charged for the entire reservation slot, whether you have jobs running or not.
Things to keep in mind when submitting a reservation request:
- State clearly the reason that you need the reservation. Requesting a reservation is not a guarantee that you will receive one.
- Submit your request early, at least a week in advance. It is not always possible to drain the nodes for a reservation on short notice. The nodes may already be busy with jobs that will run for several days.
Use the Bridges-2 Reservation Request form to ask for a reservation.
If your request is approved, you wil get email from PSC User Support with the details of your reservation, including the name of the reservation.
You can see and manage your reservation with these commands:
scontrol show reservation=reservation-name- Displays the details for the named reservation.
scontrol delete reservation=reservation-name- Ends the reservation. This will prevent you from being charged for the remaining time on the reservation.
[user@bridges2-login012 ~]$ scontrol show res=myreservation
ReservationName=myreservation StartTime=2021-08-17T09:10:53 EndTime=2021-08-17T10:10:53 Duration=01:00:00
   Nodes=v007 NodeCnt=1 CoreCnt=40 Features=(null) PartitionName=GPU-shared Flags=
   TRES=cpu=40
   Users=(null) Groups=(null) Accounts=pscstaff Licenses=(null) State=ACTIVE BurstBuffer=(null) Watts=n/a
   MaxStartDelay=(null)

[user@bridges2-login012 ~]$ scontrol delete res=myreservation
[user@bridges2-login012 ~]$ scontrol show res=myreservation
Reservation myreservation not found
[user@bridges2-login012 ~]$
slurm-tool
The slurm-tool command can provide information about your running, queued or completed jobs. It can also show the jobs that are running or queued in a partition or give the limits on partitions.
For help on its options, type slurm-tool -h.
[user@bridges2-login011 ~]$ slurm-tool -h Show or watch job queue: slurm-tool [watch] queue show own jobs slurm-tool [watch] qshow user's jobs slurm-tool [watch] quick show quick overview of own jobs slurm-tool [watch] shorter sort and compact entire queue by job size slurm-tool [watch] short sort and compact entire queue by priority slurm-tool [watch] full show everything slurm-tool [w] [q|qq|ss|s|f] shorthands for above! slurm-tool qos show job service classes slurm-tool top [queue|all] show summary of active users Show detailed information about jobs: slurm-tool prio [all|short] show priority components slurm-tool j|job show everything else slurm-tool steps show memory usage of running srun job steps Show usage and fair-share values from accounting database: slurm-tool h|history
showuserjobs
The showuserjobs command allows you to see current queued and running jobs. It also allows you to see jobs sorted by account. To get help, type showuserjobs -h.
[user@bridges2-login014 ~]$ showuserjobs -h
Usage: /opt/packages/interact/bin/showuserjobs [-u username] [-a account] [-p partition] [-q QOS] [-A] [-C] [-h]
where:
        -u username: Print only jobs for this PSC username
        -a account: Print only jobs in Slurm account
        -A: Print only ACCT_TOTAL lines
        -C: Print comma separated lines for Excel
        -p partition: Print only jobs in partition
        -q qos-list: Print only jobs in QOS
        -r: Print additional job Reason columns
        -h: Print this help information
sinfo
The sinfo command displays information about the state of Bridges-2's nodes. The nodes can have several states:
| alloc | Allocated to a job |
| down | Down |
| drain | Not available for scheduling |
| idle | Free |
| resv | Reserved |
More information
squeue
The squeue command displays information about the jobs in the partitions. Some useful options are:
| -j jobid | Displays the information for the specified jobid |
| -u PSC-username | restricts information to jobs belonging to the specified PSC username |
| -p partition | Restricts information to the specified partition |
| -l | (long) Displays information including: time requested, time used, number of requested nodes, the nodes on which a job is running, job state and the reason why a job is waiting to run. |
More information
- squeue man page for a discussion of the codes for job state, for why a job is waiting to run, and more options.
scancel
The scancel command is used to kill a job in a partition, whether it is running or still waiting to run. Specify the jobid for the job you want to kill. For example,
scancel 12345
kills job # 12345.
More information
sacct
The sacct command can be used to display detailed information about jobs. It is especially useful in investigating why one of your jobs failed. The general format of the command is:
sacct -X -j nnnnnn -S MMDDYY --format parameter1,parameter2, ...
- For 'nnnnnn' substitute the jobid of the job you are investigating.
- The date given for the -S option is the date at which
sacctbegins searching for information about your job. - The commas between the parameters in the --format option cannot be followed by spaces.
The --format option determines what information to display about a job. Useful parameters are
- JobID
- Partition
- Account - the allocation id
- ExitCode - useful in determining why a job failed
- State - useful in determining why a job failed
- Start, End, Elapsed - start, end and elapsed time of the job
- NodeList - list of nodes used in the job
- NNodes - how many nodes the job was allocated
- MaxRSS - how much memory the job used
- AllocCPUs - how many cores the job was allocated
More information
job_info
The job_info command provides information on completed jobs. It will display cores and memory allocated and SUs charged for the job. Options to job_info can be used to get additional information, like the exit code, number of nodes allocated, and more.
Options for sinfo are:
-slurm, adds all slurm info for the job level as sacct output--steps, adds all slurm info for the job and all job steps (this can be a LOT of output)
[joeuser@br012 ~]$ /opt/packages/allocations/bin/job_info 5149_24
CoresAllocated: 96
EndTime: 2021-01-06T14:32:00.000Z
GPUsAllocated: 0
JobId: 5149_24
MaxTaskMemory_MB: 1552505.0
MemoryAllocated_MB: 4128000
Project: abc123
StartTime: 2021-01-06T13:07:14.000Z
State: COMPLETED
SuCharged: 0.0
SuUsed: 135.627
Username: joeuser
Using the -slurm option will provide this output IN ADDTION:
[joeuser@br012 ~]$ /opt/packages/allocations/bin/job_info --slurm 5149_24

*** Slurm SACCT data ***
Account: abc123
AllocCPUS: 96
AllocNodes: 1
AllocTRES: billing=96,cpu=96,mem=4128000M,node=1
AssocID: 234
CPUTime: 5-15:37:36
CPUTimeRAW: 488256
Cluster: bridges2
DBIndex: 10092
DerivedExitCode: 0:0
Elapsed: 01:24:46
ElapsedRaw: 5086
Eligible: 2021-01-06T02:27:34
End: 2021-01-06T14:32:00
ExitCode: 0:0
Flags: SchedMain
GID: 15312
Group: abc123
JobID: 5149_24
JobIDRaw: 5196
JobName: run_velveth_gcc10.2.0_96threads_ocean.sbatch
NCPUS: 96
NNodes: 1
NodeList: e002
Partition: EM
Priority: 4294900776
QOS: lm
QOSRAW: 4
ReqCPUS: 96
ReqMem: 4128000Mn
ReqNodes: 1
ReqTRES: billing=96,cpu=96,node=1
Reserved: 10:39:40
ResvCPU: 42-15:28:00
ResvCPURAW: 3684480
Start: 2021-01-06T13:07:14
State: COMPLETED
Submit: 2021-01-06T02:27:33
Suspended: 00:00:00
SystemCPU: 52:13.643
Timelimit: 06:00:00
TimelimitRaw: 360
TotalCPU: 3-15:06:51
UID: 19178
User: joeuser
UserCPU: 3-14:14:37
WCKeyID: 0
WorkDir: /ocean/projects/abc123/joeuser/velvet
Monitoring memory usage
It can be useful to find the memory usage of your jobs. For example, you may want to find out if memory usage was a reason a job failed.
You can determine a job's memory usage whether it is still running or has finished. To determine if your job is still running, use the squeue command.
squeue -j nnnnnn -O state
where nnnnnn is the jobid.
For running jobs: srun and top or sstat
You can use the srun and top commands to determine the amount of memory being used.
srun --jobid=nnnnnn top -b -n 1 | grep PSC-username
For nnnnnn substitute the jobid of your job. For 'PSC-username' substitute your PSC username. The RES field in the output from top shows the actual amount of memory used by a process. The top man page can be used to identify the fields in the output of the top command.
You can also use the sstat command to determine the amount of memory being used in a running job
sstat -j nnnnnn.batch --format=JobID,MaxRss
where nnnnnn is your jobid.
More information
See the man page for sstat for more information.
For jobs that are finished: sacct or job_info
If you are checking within a day or two after your job has finished you can issue the command
sacct -j nnnnnn --format=JobID,MaxRss
If this command no longer shows a value for MaxRss, use the job_info command
job_info nnnnnn | grep max_rss
Substitute your jobid for nnnnnn in both of these commands.
- See the man page for sacct for more information.
More information
- Online documentation for SLURM, including man pages for all the SLURM commands
Both sample batch scripts for some popular software packages and sample batch scripts for general use on Bridges-2 are available.
For more information on how to run a job on Bridges-2, what partitions are available, and how to submit a job, see the Running Jobs section of this user guide.
Sample batch scripts for popular software packages
Sample scripts for some popular software packages are available on Bridges-2 in the directory /opt/packages/examples. There is a subdirectory for each package, which includes the script along with input data that is required and typical output.
See the documentation for a particular package for more information on using it and how to test any sample scripts that may be available.
Sample batch scripts for common types of jobs
Sample Bridges-2 batch scripts for common job types are given below.
Note that in each sample script:
- The bash shell is used, indicated by the first line ‘!#/bin/bash’. If you use a different shell some Unix commands will be different.
- For PSC-username and groupname you must substitute your PSC username and your appropriate Unix group.
Sample scripts are available for
Sample batch script for a job in the RM partition
#!/bin/bash
#SBATCH -N 1
#SBATCH -p RM
#SBATCH -t 5:00:00
#SBATCH --ntasks-per-node=128

# type 'man sbatch' for more information and options
# this job will ask for 1 full RM node (128 cores) for 5 hours
# this job would potentially charge 640 RM SUs

#echo commands to stdout
set -x

# move to working directory
# this job assumes:
# - all input data is stored in this directory
# - all output should be stored in this directory
# - please note that groupname should be replaced by your groupname
# - PSC-username should be replaced by your PSC username
# - path-to-directory should be replaced by the path to your directory where the executable is

cd /ocean/projects/groupname/PSC-username/path-to-directory

# run a pre-compiled program which is already in your project space

./a.out
Sample script for a job in the RM-shared partition
#!/bin/bash
#SBATCH -N 1
#SBATCH -p RM-shared
#SBATCH -t 5:00:00
#SBATCH --ntasks-per-node=64

# type 'man sbatch' for more information and options
# this job will ask for 64 cores in RM-shared and 5 hours of runtime
# this job would potentially charge 320 RM SUs

#echo commands to stdout
set -x

# move to working directory
# this job assumes:
# - all input data is stored in this directory
# - all output should be stored in this directory
# - please note that groupname should be replaced by your groupname
# - PSC-username should be replaced by your PSC username
# - path-to-directory should be replaced by the path to your directory where the executable is

cd /ocean/projects/groupname/PSC-username/path-to-directory

# run a pre-compiled program which is already in your project space

./a.out
Sample batch script for a job in the RM-512 partition
Sample batch script for a job in the RM-512 partition
#!/bin/bash
#SBATCH -N 1
#SBATCH -p RM-512
#SBATCH -t 5:00:00
#SBATCH --ntasks-per-node=128

# type 'man sbatch' for more information and options
# this job will ask for 1 full RM 512GB node (128 cores) for 5 hours
# this job would potentially charge 640 RM SUs

#echo commands to stdout
set -x

# move to working directory
# this job assumes:
# - all input data is stored in this directory
# - all output should be stored in this directory
# - please note that groupname should be replaced by your groupname
# - PSC-username should be replaced by your PSC username
# - path-to-directory should be replaced by the path to your directory where the executable is

cd /ocean/projects/groupname/PSC-username/path-to-directory

# run a pre-compiled program which is already in your project space

./a.out
Sample batch script for a job in the EM partition
#!/bin/bash
#SBATCH -N 1
#SBATCH -p EM
#SBATCH -t 5:00:00
#SBATCH -n 96

# type 'man sbatch' for more information and options
# this job will ask for 1 full EM node (96 cores) and 5 hours of runtime
# this job would potentially charge 480 EM SUs

# echo commands to stdout
set -x

# move to working directory
# this job assumes:
# - all input data is stored in this directory
# - all output should be stored in this directory
# - please note that groupname should be replaced by your groupname
# - PSC-username should be replaced by your PSC username
# - path-to-directory should be replaced by the path to your directory where the executable is

cd /ocean/projects/groupname/PSC-username/path-to-directory

#run pre-compiled program which is already in your project space

./a.out
Sample batch script for a job in the GPU partition
#!/bin/bash
#SBATCH -N 1
#SBATCH -p GPU
#SBATCH -t 5:00:00
#SBATCH --gpus=v100-32:8

#type 'man sbatch' for more information and options
#this job will ask for 1 full v100-32 GPU node(8 V100 GPUs) for 5 hours
#this job would potentially charge 40 GPU SUs

#echo commands to stdout
set -x

# move to working directory
# this job assumes:
# - all input data is stored in this directory
# - all output should be stored in this directory
# - please note that groupname should be replaced by your groupname
# - PSC-username should be replaced by your PSC username
# - path-to-directory should be replaced by the path to your directory where the executable is

cd /ocean/projects/groupname/PSC-username/path-to-directory

#run pre-compiled program which is already in your project space

./gpua.out
Sample batch script for a job in the GPU-shared partition
#!/bin/bash
#SBATCH -N 1
#SBATCH -p GPU-shared
#SBATCH -t 5:00:00
#SBATCH --gpus=v100-32:4

#type 'man sbatch' for more information and options
#this job will ask for 4 V100 GPUs on a v100-32 node in GPU-shared for 5 hours
#this job would potentially charge 20 GPU SUs

#echo commands to stdout
set -x

# move to working directory
# this job assumes:
# - all input data is stored in this directory
# - all output should be stored in this directory
# - please note that groupname should be replaced by your groupname
# - PSC-username should be replaced by your PSC username
# - path-to-directory should be replaced by the path to your directory where the executable is

cd /ocean/projects/groupname/PSC-username/path-to-directory

#run pre-compiled program which is already in your project space

./gpua.out
Slurm Job Array
Please review Slurm’s official documentation for a complete list of options:
https://slurm.schedmd.com/job_array.html
Job arrays offer a mechanism for submitting and managing collections of similar jobs quickly and easily; job arrays with millions of tasks can be submitted in milliseconds (subject to configured size limits). Note: All jobs in the array must have the same initial options (e.g. size, time limit, etc.)
Sample batch script for a Slurm Job Array:
#!/bin/bash
#SBATCH -t 01:00:00
#SBATCH -p RM-shared
#SBATCH --ntasks-per-node 1
#SBATCH --array=1-3
#SBATCH --job-name=ArrayTest
#SBATCH --output=slurm-%A_%a.out
#SBATCH --error=slurm-%A_%a.err

module load anaconda3
conda activate environmentName

echo $SLURM_ARRAY_JOB_ID
echo $SLURM_ARRAY_TASK_ID

which python
python script.py
#END
The OnDemand interface allows you to conduct your research on Bridges-2 through a web browser. You can manage files – create, edit and move them – submit and track jobs, see job output, check the status of the queues, run a Jupyter notebook through JupyterHub and more, without logging in to Bridges-2 via traditional interfaces.
OnDemand was created by the Ohio Supercomputer Center (OSC). In addition to this document, you can check the extensive documentation for OnDemand created by OSC, including many video tutorials, or email help@psc.edu.
Note
You cannot use OnDemand to submit a job to the EM partition.
Connect to Bridges-2 using OnDemand
To connect to Bridges-2 via OnDemand, point your browser to https://ondemand.bridges2.psc.edu.
- You will be prompted for a username and password. Enter your PSC username and password.
- The OnDemand Dashboard will open. From this page, you can use the menus across the top of the page to manage files and submit jobs to Bridges-2.
To end your OnDemand session, choose Log Out at the top right of the Dashboard window and close your browser.
Manage files
To create, edit or move files, click on the Files menu from the Dashboard window. A dropdown menu will appear, listing all your file spaces on Bridges-2: your home directory and the Ocean directories for each of your Bridges-2 allocations.
Choosing one of the file spaces opens the File Explorer in a new browser tab. The files in the selected directory are listed. No matter which directory you are in, your home directory is displayed in a panel on the left.
There are two sets of buttons in the File Explorer.
Buttons on the top left just below the name of the current directory allow you to View, Edit, Rename, Download, Copy or Paste (after you have moved to a different directory) a file, or you can toggle the file selection with (Un)Select All.

Buttons on the top of the window on the right perform these functions:
| Go To | Navigate to another directory or file system |
| Open in Terminal | Open a terminal window on Bridges-2 in a new browser tab |
| New File | Creates a new empty file |
| New Dir | Create a new subdirectory |
| Upload | Copies a file from your local machine to Bridges-2 |
| Show Dotfiles | Toggles the display of dotfiles |
| Show Owner/Mode | Toggles the display of owner and permisson settings |

Create and edit jobs
You can create new job scripts, edit existing scripts, and submit those scripts to Bridges-2 through OnDemand.
From the top menus in the Dashboard window, choose Jobs > Job Composer. A Job Composer window will open.
There are two tabs at the top: Jobs and Templates.
In the Jobs tab, a listing of your previous jobs is given.

Create a new job script
To create a new job script:
- Select a template to begin with
- Edit the job script
- Edit the job options
Select a template
- Go to the Jobs tab in the Jobs Composer window. You have been given a default template, named Simple Sequential Job.
- To create a new job script, click the blue New Job > From Default Template button in the upper left. You will see a green message at the top of the window, “Job was successfully created”.
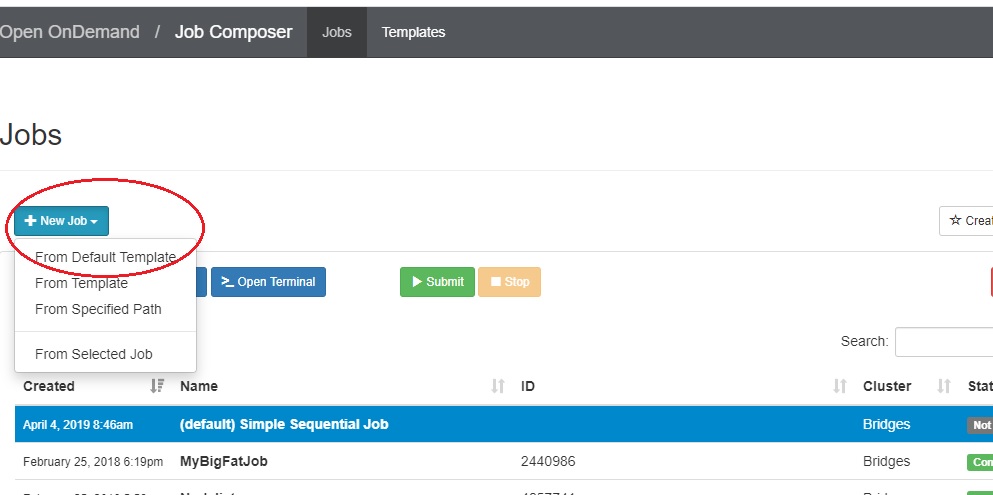
At the right of the Jobs window, you will see the Job Details, including the location of the script and the script name (by default, main_job.sh). Under that, you will see the contents of the job script in a section titled Submit Script.
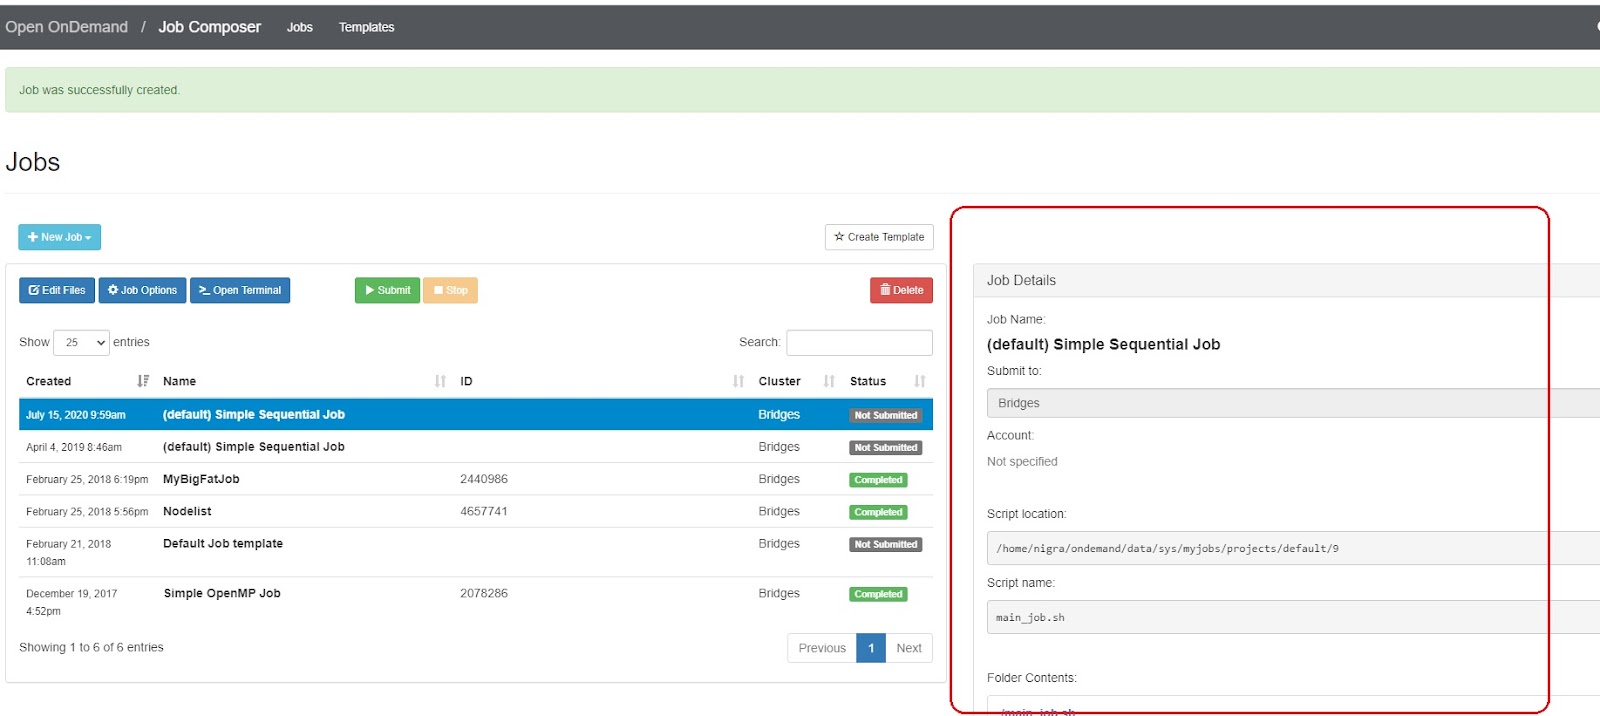
Edit the job script
Edit the job script so that it has the commands and workflow that you need.
If you do not want the default settings for a job, you must include options to change them in the job script. For example, you may need more time or more than one node. For the GPU partitions, you must specify the number of GPUs per node that you want. Use an SBATCH directive in the job script to set these options.
There are two ways to edit the job script: using the Edit Files button or the Open Editor button. First, go to the Jobs tab in the Jobs Composer window.
Find the blue Edit Files tab at the top of the window
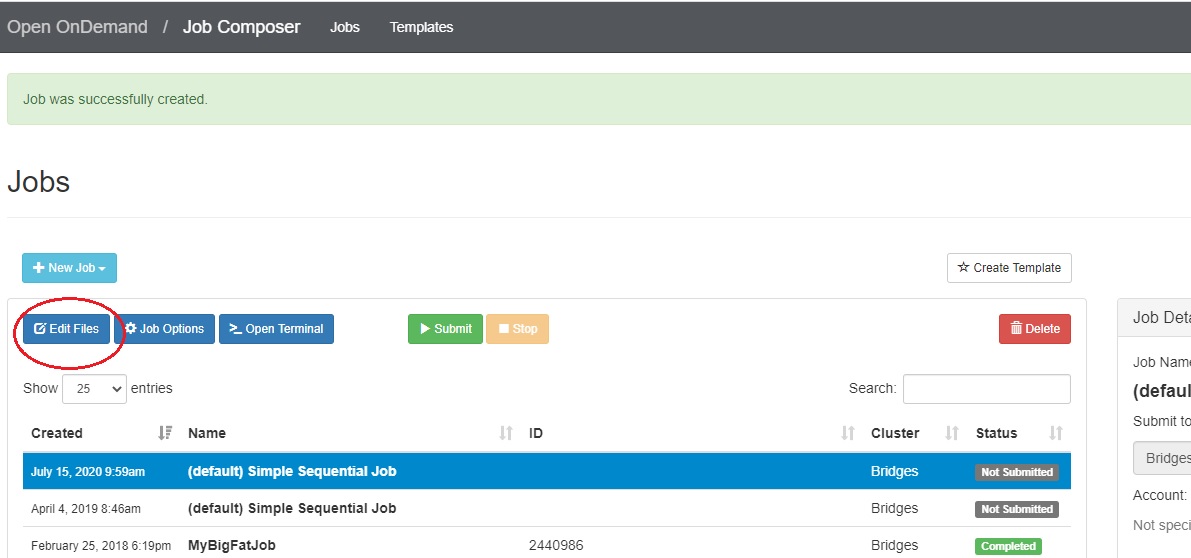
Find the Submit Script section at the bottom right. Click the blue Open Editor button.
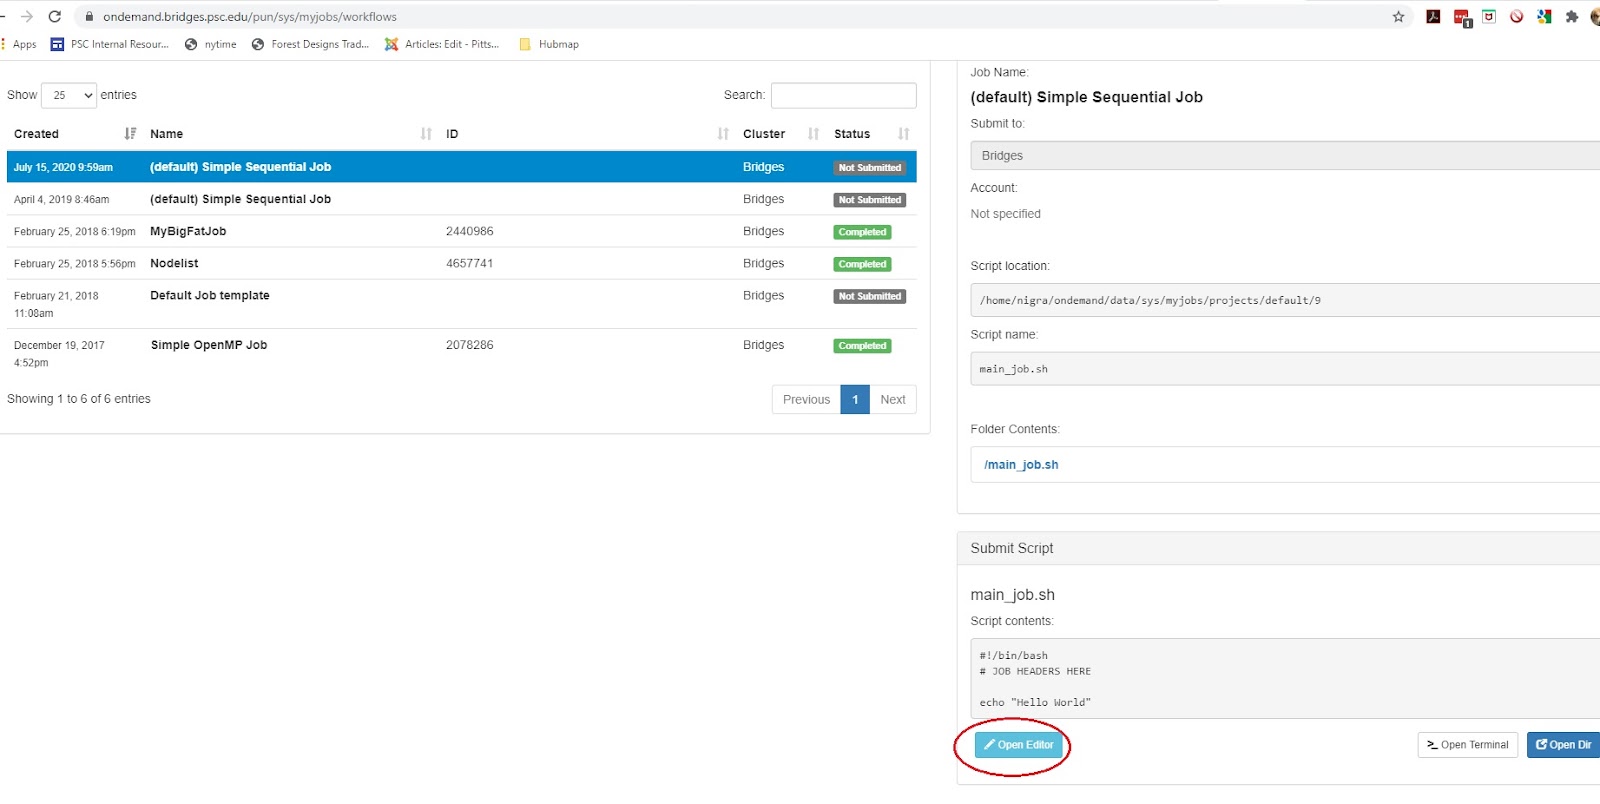
In either case, an Editor window opens. Make the changes you want and click the blue Save button.

After you save the file, the editor window remains open, but if you return to the Jobs Composer window, you will see that the content of your script has changed.
Edit the job options
In the Jobs tab in the Jobs Composer window, click the blue Job Options button.

The options for the selected job such as name, the job script to run, and the account to run it under are displayed and can be edited. Click Reset to revert any changes you have made. Click Save or Back to return to the job listing (respectively saving or discarding your edits).

Submit jobs to Bridges-2
Select a job in the Jobs tab in the Jobs Composer window. Click the green Submit button to submit the selected job. A message at the top of the window shows whether the job submission was successful or not. If it is not, you can edit the job script or options and resubmit. When the job submits successfully, the status of the job in the Jobs Composer window will change to Queued or Running. When the job completes, the status will change to Completed.
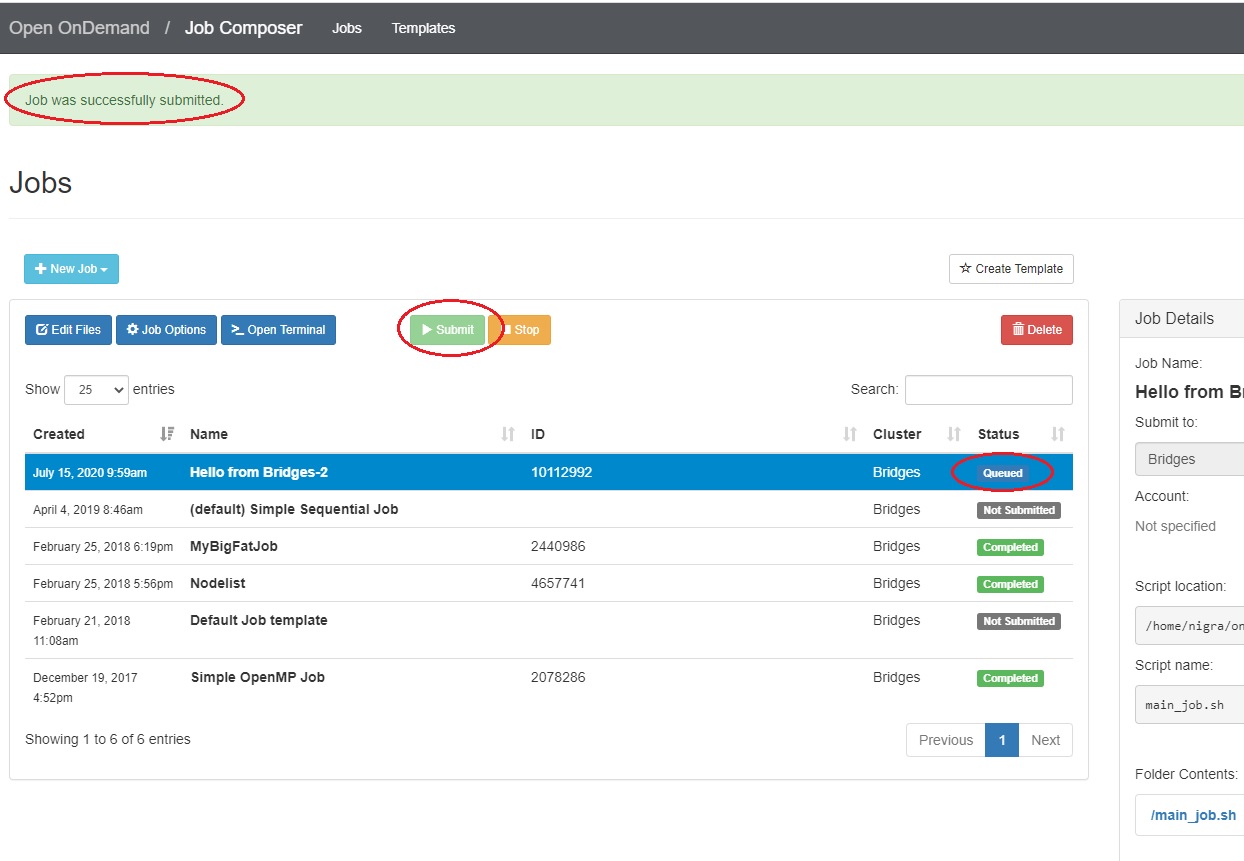
You can run Jupyter Notebooks through OnDemand.
- Select Interactive Apps > Jupyter Notebook from the top menu in the Dashboard window.
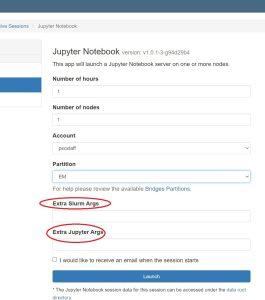
- In the screen that opens, specify the timelimit, number of nodes, and partition to use. If you have mutiple allocations on Bridges2, you can also designate the account to deduct this usage from.
- Use the Extra Slurm Args field to specify the number of cores or number of GPUs you want.
- If you will use the RM-shared or EM partition, use the
--ntasks-per-node=nflag to indicate that you want to use n cores. Note that there are two hyphens preceding ‘ntasks-per-node’. - If you will use one of the GPU partitions, use the
--gpus=nflag to indicate that you want to use n GPUs per node. Note that there are two hyphens preceding ‘gpus’.
See the Running jobs section of this User Guide for more information on Bridges-2 partitions and the options available. - Use the Extra Jupyter Args field to pass arguments to your Jupyter notebook.
- If you will use the RM-shared or EM partition, use the
- Click the blue Launch button to start your JupyterHub session. You may have to wait in the queue for resources to be available.
- When your session starts, click the blue Connect to Jupyter button. The Dashboard window now displays information about your JupyterHub session including which node it is running on, when it began, and how much time remains. A new window running JupyterHub also opens. Note the three tabs: Files, Running and Clusters.
By default you are in the Files tab, and it displays the contents of your Bridges home directory. You can navigate through your home directory tree.
Running
Under the Running tab, you will see listed any notebooks or terminal sessions that you are currently running.
- Now you can start a Jupyter notebook:
- To start a Jupyter notebook which is stored in your home directory space, in the Files tab, click on its name. A new window running the notebook opens.
- To start a Jupyter notebook which is stored in your ocean directory, you must first create a symbolic link to it from your home directory. While in your home directory, use a command like
ln -s /ocean/projects/groupname/PSC-username OCEANDIR
where you subtitute your Unix group for groupname and your PSC username for PSC-username.
When you enter JuypterHub, you will see the entry OCEANDIR in your list of files under the Files tab. Click on this to be moved to your directory.
You can use the Python “ipykernel” package to create a definition file for Jupyter Notebook which uses a custom Python installation rather than the default one. After creating that file and launching Jupyter Notebooks via OnDemand, you can use your custom environment.
The steps to do this are:
- Install “ipykernel”
- Create the custom Jupyter Notebook kernel
- Start the custom Jupyter Notebook kernel
This process can be performed with a custom conda environment, with the Python installation in the Bridges-2 nodes, or with any other Python installation available; the important thing is to run it from the Python environment that will be used with OnDemand.
The “ipykernel” package must be available in this environment to generate the custom kernel. The “ipykernel” package can be removed after that.
In an interactive session on Bridges-2, load and activate anaconda3.
module load anaconda3
conda activate # source /opt/packages/anaconda3/etc/profile.d/conda.sh
Create a new environment and install the “ipykernel” package along with any other packages you might need, or install “ipykernel” to any existing Conda environment you have.
Use a command like
conda create --name ENVIRONMENT_NAME ipykernel
conda activate ENVIRONMENT_NAME
Use a command like one below, depending on your specific case:
If you are using conda:
conda install ipykernel
If you are NOT using conda, but in a Python environment in which you have write permission
python3 -m pip install ipykernel
To use the default Bridges-2 Python installation or modules
python3 -m pip install ipykernel --user
Run “ipykernel” to create the custom Jupyter Notebook kernel, so that the Python installation is mapped using a definition file. This can be done by either running the “ipykernel” module from the environment that is going to be used, or by running the module while specifying the full path to reach that environment location.
Note: The environment must be activated before running ipykernel.
After running this command, a file is created which specifies the location of the Python environment. That file will be created under one of the following locations.
$HOME/.local/share/jupyter/kernels/ENVIRONMENT_NAME
$HOME/.ipython/kernels/ENVIRONMENT_NAME
The output of the command shows the location of this file.
(base) [user@r001 custom-kernel]$ conda activate NEW_ENV
(NEW_ENV) [user@r001 custom-kernel]$

(NEW_ENV) [user@r001 custom-kernel]$ python3 -m ipykernel install --user --name NEW_ENV --display-name "PYTHON-ENV-NAME"
Installed kernelspec NEW_ENV in /jet/home/user/.local/share/jupyter/kernels/new_env
(NEW_ENV) [user@r001 custom-kernel]$
Note: The “ipykernel” can be removed from the environment after the custom kernel is created.
Now you are ready to start your custom Jupyter notebook kernel from an interactive session in OnDemand.
In a browser window, go to ondemand.bridges2.psc.edu and log in with your PSC credentials.Navigate to Interactive Apps > Jupyter Notebook

A new screen will open which allows you to specify the paramters for your interactive session (number of hours, nodes, partition, etc.) Set the parameters for your session as needed.
Click the blue Launch button. You may have to wait for resources to be allocated to you. Once your session has started, click the blue Connect to Jupyter button.
At this point, you can start a new notebook or open an existing one.
Under the New dropdown in the upper right, choose the name of the new environment that you created.
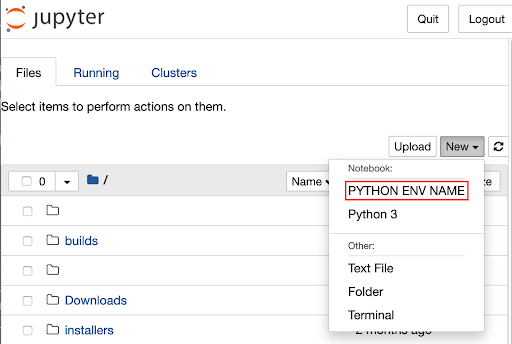
Your new Notebook will open.
Note: For installing new packages, you will have to do it from the terminal in the interactive session and NOT from the Jupyter notebook itself as it will try to use the base different conda binaries and not the ones you set in the new custom environment kernel.
If you already have a notebook, find it in the file list and click on it to open it.
Change the Python environment to use by navigating to Kernel > Change kernel. Choose the new Python environment to use.

Note: For installing new packages, you will have to do it from the terminal in the interactive session and NOT from the Jupyter notebook itself as it will try to use the base different conda binaries and not the ones you set in the new custom environment kernel.
Similar to the process described on https://stackoverflow.com/questions/63702536/jupyter-starting-a-kernel-in-a-docker-container, a Python installation inside a Singularity container can be used from Jupyter Notebook as well, although the process is somewhat manual for now.
Create a new directory under $HOME/.local/share/jupyter/kernels/ and add a kernel.json file
there with the commands needed for Singularity to start the python binary it has inside.
Example:
mkdir -p $HOME/.local/share/jupyter/kernels/tensorflow_latest/
vim $HOME/.local/share/jupyter/kernels/tensorflow_latest/kernel.json
{
    "argv": [
        "/usr/bin/singularity",
        "exec",
        "--nv",
        "--bind",
        "/ocean,{connection_file}:/connection-spec",
        "/ocean/containers/ngc/tensorflow/tensorflow_latest.sif",
        "python",
        "-m",
        "ipykernel_launcher",
        "-f",
        "/connection-spec"
    ],
    "display_name": "tensorflow_latest",
    "language": "python"
}
Then start Jupyter Notebook and select the newly created kernel. The libraries inside the container should be there.
Errors
If you get an “Internal Server Error” when starting a JupyterHub session, you may be over your home directory quota. Check the Details section of the error for a line like:
#<ActionView::Template::Error: Disk quota exceeded @ dir_s_mkdir - /home/joeuser/ondemand/data/sys/dashboard/batch_connect/sys/jupyter_app...............
You can confirm that you are over quota by opening a Bridges-2 shell access window and typing
du -sh
This command shows the amount of storage in your home directory. Home directory quotas are 10GB. If du -sh shows you are near 10GB, you should delete or move some files out of your home directory. You can do this in OnDemand in the File Explorer window or in a shell access window.
When you are under quota, you can try starting a JupyterHub session again.
Stopping your JupyterHub session
In the Dashboard window, click the red Delete button.
Bridges-2’s GPU nodes provide substantial, complementary computational power for deep learning, simulations and other applications.
A standard NVIDIA accelerator environment is installed on Bridges-2’s GPU nodes. If you have programmed using GPUs before, you should find this familiar. Please contact help@psc.edu for more help.
The GPU nodes on Bridges-2 are available to those with an allocation that includes “Bridges-2 GPU”. You can see which of Bridges-2’s resources that you have been allocated with the projects command. See “The projects command” section in the Account Administration section of this User Guide for more information.
Hardware description
See the System configuration section of this User Guide for hardware details for all GPU node types.
File systems
The $HOME (/jet/home) and Ocean file systems are available on all of these nodes. See the File Spaces section of this User Guide for more information on these file systems.
Compiling and running jobs
After your codes are compiled, use the GPU partition, either in batch or interactively, to run your jobs. See the Running Jobs section of this User Guide for more information on Bridges-2’s partitions and how to run jobs.
CUDA
More information on using CUDA on Bridges-2 can be found in the CUDA document.
To use CUDA, first you must load the CUDA module. To see all versions of CUDA that are available, type:
module avail cuda
Then choose the version that you need and load the module for it.
module load cuda
loads the default CUDA. To load a different version, use the full module name.
module load cuda/8.0
OpenACC
Our primary GPU programming environment is OpenACC.
The NVIDIA compilers are available on all GPU nodes. To set up the appropriate environment for the NVIDA compilers, use the module command:
module load nvhpc
Read more about the module command at PSC.
If you will be using these compilers often, it will be useful to add this command to your shell initialization script.
There are many options available with these compilers. See the online NVIDIA documentation for detailed information. You may find these basic OpenACC options a good place to start:
nvcc –acc yourcode.c
nvfortran –acc yourcode.f90
Adding the “-Minfo=accel” flag to the compile command (whether nvfortran, nvcc or nvc++) will provide useful feedback regarding compiler errors or success with your OpenACC commands.
nvfortran -acc -Minfo=accel yourcode.f90
Hybrid MPI/GPU jobs
To run a hybrid MPI/GPU job use the following commands for compiling your program. Use module spider cuda and module spider openmpi to see what the module versions are.
module load cuda
module load openmpi/version-nvhpc-version
mpicc -acc yourcode.c
When you execute your program you must first issue the above two module load commands.
Profiling and debugging
For CUDA codes, use the command line profiler nvprof. See the CUDA document for more information.
For OpenACC codes, the environment variables NV_ACC_TIME, NV_ACC_NOTIFY and NV_ACC_DEBUG can provide profiling and debugging information for your job. Specific commands depend on the shell you are using.
| Bash shell | C shell | |
|---|---|---|
| Performance profiling | ||
| Enable runtime GPU performance profiling | export NV_ACC_TIME=1 | setenv NV_ACC_TIME 1 |
| Debugging | ||
| Basic debugging For data transfer information, set PGI_ACC_NOTIFY to 3 |
export NV_ACC_NOTIFY=1 | setenv NV_ACC_NOTIFY 1 |
| More detailed debugging | export NV_ACC_DEBUG=1 | setenv NV_ACC_DEBUG 1 |
There are multiple ways to set up custom development environments on Bridges-2. They include:
- Using Singularity containers
- Using predefined Bridges-2 environment modules
- Using a conda module environment
- Using the default Python installation. This method is not supported and not recommended unless you are familiar with virtualenvs and pip.
We recommend using Singularity containers, especially the ones from the the NVIDIA NGC catalog if there is one that fits your needs, as those are curated by NVIDIA and optimized for their GPUs. Otherwise, try using the predefined Bridges-2 modules, or creating a custom Anaconda environment.
Using Singularity containers
Bridges-2 supports running Singularity containers, allowing encapsulated environments to be built from scratch. You cannot use Docker containers on Bridges-2, but you can download a Docker container and convert it to Singularity format. Examples are given below showing how to convert containers.
There are many containers for AI/BD applications already installed on Bridges-2 in directory /ocean/containers/ngc. These are already in Singularity format and ready to use. You can use one of these containers or you can create a container of your own.
| When to use Singularity containers | Advantages | Disadvantages |
|---|---|---|
|
|
|
You can pull a Docker container into Bridges-2 and convert it to
Singularity format with the Singularity pull command.
Note This should be done in an interactive session on Bridges-2. See the Interactive sessions section in the Bruidges-2 User Guide for more information.
To pull a container from DockerHub and convert it to Singularity:
interact  # Start an interactive session on a Regular Memory node.
singularity pull --disable-cache docker://alpine:latest  # Pull the latest "alpine" container from DockerHub.
You should now have a ".sif" file. That's the container converted into Singularity Image Format (SIF).
To pull a container from the NVIDIA NGC library and convert it to Singularity:
interact  # Start an interactive session on a Regular Memory node.
singularity pull --disable-cache docker://nvcr.io/nvidia/pytorch:22.12-py3` # Pull the 22.12 PyTorch container from NGC.
You should now have a ".sif" file. That's the container converted into Singularity Image Format (SIF).
These examples pulled a container from DockerHub, using "docker://" as the origin string in the singularity pull command, but there are other
valid container origin points to pull containers from:
- The Singularity Container Library
- Use "library://" as the origin string in the
singularity pullcommand
- Use "library://" as the origin string in the
-
Singularity Hub
- Use "shub://" as the origin string in the
singularity pullcommand
- Use "shub://" as the origin string in the
Once you have a Singularity container, start an interactive session on Bridges-2 and start your container. See the section on interactive sessions in the Bridges-2 User Guide for details on the interact command.
interact   # Start an interactive session.
singularity shell --nv /path/to/CONTAINER.sif
More information on using Singularity at PSC can be found in the PSC Singularity documentation.
interact  # Start an interactive session.
# The path to the container is long. Let’s use a variable for readability.
CONTAINER=/ocean/containers/ngc/tensorflow/tensorflow_latest.sif

# Pull the container. Specify no cache dir to be used so only the local disk is used.
# Then use pip freeze to confirm what is installed
singularity exec --nv ${CONTAINER} pip freeze | grep tensorflow
    tensorflow @ file:/// [...] 2.10.1 [...]
    tensorflow-addons==0.11.2
    tensorflow-datasets==3.2.1
    tensorflow-estimator==2.10.0
    tensorflow-metadata==1.12.0
    tensorflow-nv-norms @ file:/// [...]
tensorflow-probability==0.11.1When the container you need is not present on Bridges-2 already, you can pull one from a given URI. Run the following commands in an interactive session to pull a container to Bridges-2. See the section on interactive sessions in the Bridges-2 User Guide for details on the interact command.
This example pulls a container from Docker Hub and then saves it to $PROJECT for later use.
# Start a job for building the container faster.
interact

# Change to the high-speed flash storage folder.
cd $LOCAL

# Pull the external container by specifying the origin right before the tag.
# i.e. for pulling Docker containers, use “docker://”
singularity pull --disable-cache docker://USERNAME/CONTAINER

# Finally, since the $LOCAL storage is fast but ephemeral, copy the container back to your file space.
cp CONTAINER.sif $PROJECT/ # Or $HOME
Using predefined Bridges-2 environment modules
PSC has built some environments which provide a rich, unified, Anaconda-based environment for AI, Machine Learning, and Big Data applications. Each environment includes several popular AI/ML/BD packages, selected to work together well.
These environments are built for the GPU nodes on Bridges-2. Be sure to use one of the GPU partitions. See the Bridges-2 User Guide for information on Bridges-2 partitions and how to choose one to use.
To use an already existing environment from Bridges-2, identify the environment module to use and load it.
To see a list of the available environments, type
module spider AI
To see what is included in a given environment before you load it, you can use the module show module_name command.
| When to use Bridges-2 modules | Advantages | Disadvantages |
|---|---|---|
| When using libraries that are popular for Data Science or Machine Learning, as those are most likely available on Bridges-2 as a module. |
The Bridges-2 modules available are installed, tested, and supported by PSC staff, and are configured in a way to get the best performance on Bridges-2. |
The modules cannot be modified unless a local copy for the user is created. |
interact   # Start an interactive session

module avail AI
    AI/anaconda3-tf2.2020.11
    AI/pytorch_22.07-1.12-py3
    AI/tensorflow_22.07-2.8-py3

module load AI/anaconda3-tf2.2020.11

# Check what version of tensorflow you have
pip freeze | grep tensorflow
    tensorflow==2.0.0
    tensorflow-estimator==2.0.0
Using a conda module environment
Using a conda environment allows you to set up an environment from scratch. First load an Anaconda module and then create a new environment by specifying a name for your new environment and the packages to include.
Please note that there is a default Anaconda environment with multiple packages already installed on Bridges-2 (base), but that default environment cannot be extended. That is why you may want to create a new environment from scratch.
We recommend that you install all of the packages at the same time, since conda tries to make the packages compatible as much as possible every time a new one is installed. That is, if all of the packages required are installed at the same time, only one package-compatibility process is run; but if the packages are installed one at a time, the package-compatibility process will have to run once per package and the overall installation will take a lot longer.
You can install as many packages as you like with one command. Optionally, you can choose the versions of your packages, although leaving versions unspecified allows conda to find the best option.
Examples of the syntax of the command to create an environment and install packages are given here. Refer to the conda documentation for full details.
conda create -n ENV_NAME PACKAGE1
conda create -n ENV_NAME python=3.VERSION.MINORVERSION PACKAGE2 PACKAGE3
| When to use a conda module | Advantages | Disadvantages |
|---|---|---|
| When the available Bridges-2 modules do not have a library that is also required for a project or the versions are slightly different as to what is needed (i.e. TensorFlow 2.1 instead of 2.2) |
|
|
interact # Start an interactive session

module load anaconda3
conda activate

conda create -n my_tf2_env tensorflow>=2
conda activate my_tf2_env

# Check which version of tensorflow you have
pip freeze | grep tensorflow
    tensorflow==2.6.2
    tensorflow-estimator==2.6.0
NOTE: make sure that the target directory for the Anaconda
environments is pointing to the "$PROJECT" folder. Your $PROJECT
quota is much larger than your $HOME directory quota.
More information can be found in the PSC Anaconda documentation at https://www.psc.edu/resources/software/anaconda/.
Using the default python
Both "python, pip" and "python3, pip3" are available on Bridges-2
by default when logging into the nodes. These distributions that
are available by default can be customized by installing packages,
although the base Python version cannot be changed.
Note: PSC does not offer support for user-customized python environments.
This way of customizing the default Python environment allows you to install packages using the "--user" flag, making it
possible to extend the base package list and install
libraries. Additionally, pip can be used both as the default binary or
as a Python module. The following example shows both ways, but it’s
recommended to use it as a Python module (with "python -m pip") so
the original default pip is not used anymore after updating the
package manager version.
interact   # Start an interactive session

python3 -m pip install PACKAGE1 --user
pip3 install PACKAGE2==VERSION --userinteract # Start an interactive session
# Add the local Python-binaries path to your PATH environment variable.
# This line could also be added to your local ~/.bashrc file.
export PATH=”${PATH}:${HOME}/.local/bin”
# Install TensorFlow
python3 -m pip install tensorflow --user
Collecting tensorflow
Downloading tensorflow-2.[...]
[...]
Successfully installed [...]
# Double-check if TensorFlow was indeed installed.
python3 -m pip freeze | grep tensorflow
tensorflow==2.6.2
tensorflow-estimator==2.6.0
# Upgrade pip for getting rid of the package-manager-related warnings.
python3 -m pip install --upgrade pip --userNote: The installed packages should have been stored under the following
directory: $HOME/.local/lib/python3.6/site-packages/
Additionally, installing tools such as "virtualenv" for managing different environments is also supported.
Note: Having locally installed libraries, and then running Python from inside a Singularity/AppTainer container,
might create problems for your containerized jobs as the Python installation inside the container might try using your
$HOME/.local/lib/ packages and thus create instability due to incompatible configurations (container + local packages
mix).
| When to use Python | Advantages | Disadvantages |
|---|---|---|
|
Immediately available for simple tests. |
|
Conda is a Python package distribution that allows you to set up development environments and handle dependencies for a curated set of packages that are widely used for Data Science and Machine Learning tasks. It is similar to using pip and virtual environments, but differs by providing a way to select performance-optimized packages (optimized for CPU or GPU processing elements) to be installed based on the requirements of your task.
Additionally, using conda (be it the full distribution "anaconda" or just the bare system "mini-conda"), allows you to use pip or virtualenv if needed.
Other advantages of using conda include:
- Access to performance optimized packages (MKL)
- Precompiled versions of packages, such as TensorFlow and PyTorch
- Package compatibility lists, so installed packages are compatible with each other
- Self-contained environments that can be maintained and used individually
More information can be found on the Anaconda website.
The main difference between conda and pip is that conda installs (any) software binary (no compilation required) while Pip compiles sources or wheels for (only) Python packages.
This document explains these best practices for using conda:
Use $PROJECT space for your conda folder
Be aware that each different conda environment is created using a unique environment folder. Even if there is a cache folder for downloaded packages, conda will still have to download any dependencies that are missing. That uses a lot of disk space and will fill your $HOME quota quickly.
We recommend that you store those files in your $PROJECT space instead.
To do this, create a symlink to your $PROJECT space. If you already have a conda folder in $HOME, you must move it to $PROJECT first.
# If you already have a conda folder, move it to $PROJECT.
mv ~/.conda $PROJECT/

# Create a symlink from your HOME to the moved folder.
ln -s $PROJECT/.conda ~/.conda
Load and activate the conda modules
Load the conda module by loading either the Community or the Enterprise version commands. After that, activate the base conda environment if you want to use the base packages included with Anaconda, or create a new environment yourself.
The specific instructions for activating each module can be found when running the command "module help MODULENAME".
# Python 3
module load anaconda3
conda activate
Note: The "anaconda3" module makes use of Python 3. To use Python 2, load "anaconda2" instead. However, we recommend that you convert the project to Python 3 instead.
Create a new environment
There are two ways to create a new environment: use the conda create command or the conda env create command.
You will create a blank environment if no packages are specified, or you can install a list of packages (and their dependencies) by passing those as an argument.
    # Consider renaming the conda directory to something else
    # This will create an empty environment, but it's not recommended as is because the command is not specific.
    conda create -n YOUR_ENV_NAME python

    # The packages to install should be specified when creating the environment.
    conda create -n YOUR_ENV_NAME python PACKAGE1

    # The specific Python version can also be specified.
    conda create -n YOUR_ENV_NAME python=M.N PACKAGE1

    # Example: install the latest TensorFlow 2 that is compatible with Python 3.8
conda create -n YOUR_ENV_NAME python=3.8 tensorflow=2 scipyThe conda env create command uses a structured yaml file for installing an environment based on the
complete list of packages generated from a different conda environment. The file extension is important and it should be "yaml".
Using a ".txt" extension triggers errors even if the content was in yaml format.
Example PACKAGES_LIST.yaml file for a regular pandas installation:
    name: pandas_test
    channels:
      - defaults
    dependencies:
      - _libgcc_mutex=0.1=main
      - _openmp_mutex=5.1=1_gnu
      - blas=1.0=mkl
      - bottleneck=1.3.5=py310ha9d4c09_0
      - bzip2=1.0.8=h7b6447c_0
      - ca-certificates=2023.01.10=h06a4308_0
      - certifi=2022.12.7=py310h06a4308_0
      - intel-openmp=2021.4.0=h06a4308_3561
      - ld_impl_linux-64=2.38=h1181459_1
      - libffi=3.4.2=h6a678d5_6
      - libgcc-ng=11.2.0=h1234567_1
      - libgomp=11.2.0=h1234567_1
      - libstdcxx-ng=11.2.0=h1234567_1
      - libuuid=1.41.5=h5eee18b_0
      - mkl=2021.4.0=h06a4308_640
      - mkl-service=2.4.0=py310h7f8727e_0
      - mkl_fft=1.3.1=py310hd6ae3a3_0
      - mkl_random=1.2.2=py310h00e6091_0
      - ncurses=6.4=h6a678d5_0
      - numexpr=2.8.4=py310h8879344_0
      - numpy=1.23.5=py310hd5efca6_0
      - numpy-base=1.23.5=py310h8e6c178_0
      - openssl=1.1.1s=h7f8727e_0
      - packaging=22.0=py310h06a4308_0
      - pandas=1.5.2=py310h1128e8f_0
      - pip=22.3.1=py310h06a4308_0
      - python=3.10.9=h7a1cb2a_0
      - python-dateutil=2.8.2=pyhd3eb1b0_0
      - pytz=2022.7=py310h06a4308_0
      - readline=8.2=h5eee18b_0
      - setuptools=65.6.3=py310h06a4308_0
      - six=1.16.0=pyhd3eb1b0_1
      - sqlite=3.40.1=h5082296_0
      - tk=8.6.12=h1ccaba5_0
      - tzdata=2022g=h04d1e81_0
      - wheel=0.37.1=pyhd3eb1b0_0
      - xz=5.2.10=h5eee18b_1
      - zlib=1.2.13=h5eee18b_0
    prefix: $HOME/.conda/envs/pandas_test
conda env create -f PACKAGES_LIST.yaml --prefix /PATH/TO/NEW_CONDA_ENV
# Example:
conda env create -f packages_list.yaml --prefix $PROJECT/conda_envs/project_1
source activate $PROJECT/conda_envs/project_1Note: The syntax for specifying a package version on conda is different than the syntax for pip. For example, two equal signs are used with pip for specifying the version to use, but with conda, one equal sign is required.
For example:
pip install PACKAGE_NAME==VERSION_NUMBER
# Or
conda install PACKAGE_NAME=VERSION_NUMBER
Using channels
A package may not be available in the default conda channel. In that case, it's possible to still install the package by specifying the name of the channel that has it available. However, please make sure that it's actually required to do it that way, since it's also possible to install packages using pip directly, even if that means compiling the specific packages.
# conda create -n YOUR_ENV_NAME SPECIAL_PACKAGE -c CHANNEL_NAME
conda create -n pytorch -c pytorch
Finally, make sure that the channel you are trying to use is an entity you can trust, since ill-intended individuals could make modified packages available in an attempt to get researchers to install those Trojan-horse packages, providing them with a way to access and infect even more HPC environments.
Create a backup of your environment
Backups should be created as soon as a new functional environment is successfully created. Backups allow your new environment to be easily recreated if accidental modifications are performed, access to the actual env directory is lost, or the environment has to be deployed on a different host. Creating backups involves generating a detailed list of installed packages that can be used to recreate an environment using those values as inputs.
Warning: restoring backups of environments depends on the origin and target Operating Systems being (roughly) the same. The environments will likely malfunction if they are not the same. Examples of incompatibilities:
- CPU architectures differ (x86_64 vs ppc64)
- Operating Systems differ (CenOS 6 vs CentOS 7, CentOS/RHEL vs Ubuntu/Debian)
- Compilers or system libraries not available on the target system (gcc 4.x vs gcc 5.x, 6.x)
- Package distribution channels not being available (private conda channels)
There are two main ways in which a backup can be created:
- Export the environment
- Pack the environment
Export the list of packages and then create a new environment when needed using that list as the input.
Activate the env to generate a list of the packages in it, then export the list of packages to a plain text file.
# This will create the Yaml file to use for creating the new environment. Refer to the examplel Yaml file under
# the "Create new environment" section for reference.
conda env export >> conda_env_export.yaml

# This will generate a similar list, but it might have additional details.
conda list > conda_list.txt
Example conda_list.txt file for a pandas environment:
# packages in environment at $HOME/.conda/envs/pandas_test:
#
# Name                    Version                   Build  Channel
_libgcc_mutex             0.1                        main
_openmp_mutex             5.1                       1_gnu
blas                      1.0                         mkl
bottleneck                1.3.5           py310ha9d4c09_0
bzip2                     1.0.8                h7b6447c_0
ca-certificates           2023.01.10           h06a4308_0
certifi                   2022.12.7       py310h06a4308_0
intel-openmp              2021.4.0          h06a4308_3561
ld_impl_linux-64          2.38                 h1181459_1
libffi                    3.4.2                h6a678d5_6
libgcc-ng                 11.2.0               h1234567_1
libgomp                   11.2.0               h1234567_1
libstdcxx-ng              11.2.0               h1234567_1
libuuid                   1.41.5               h5eee18b_0
mkl                       2021.4.0           h06a4308_640
mkl-service               2.4.0           py310h7f8727e_0
mkl_fft                   1.3.1           py310hd6ae3a3_0
mkl_random                1.2.2           py310h00e6091_0
ncurses                   6.4                  h6a678d5_0
numexpr                   2.8.4           py310h8879344_0
numpy                     1.23.5          py310hd5efca6_0
numpy-base                1.23.5          py310h8e6c178_0
openssl                   1.1.1s               h7f8727e_0
packaging                 22.0            py310h06a4308_0
pandas                    1.5.2           py310h1128e8f_0
pip                       22.3.1          py310h06a4308_0
python                    3.10.9               h7a1cb2a_0
python-dateutil           2.8.2              pyhd3eb1b0_0
pytz                      2022.7          py310h06a4308_0
readline                  8.2                  h5eee18b_0
setuptools                65.6.3          py310h06a4308_0
six                       1.16.0             pyhd3eb1b0_1
sqlite                    3.40.1               h5082296_0
tk                        8.6.12               h1ccaba5_0
tzdata                    2022g                h04d1e81_0
wheel                     0.37.1             pyhd3eb1b0_0
xz                        5.2.10               h5eee18b_1
zlib 1.2.13 h5eee18b_0You can now create environments using the Yaml file with the list of packages from the original env.
conda env create -f conda_env_export.yaml --prefix /PATH/TO/NEW_CONDA_ENV

# It's also possible to clone an existing environment, instead of using the yaml file.
conda create --clone ORIGIN_CONDA_ENV --prefix=/PATH/TO/NEW_CONDA_ENV
Note: These steps might not work as expected when using a shared target folder (prefix). The env could be created using the regular location first for testing purposes and generating the spec file.
Pack the whole environment into a compressed tar file, then decompress the file and unpack it when needed.
# Install "conda-pack". This can be done with either the same or a new env.
conda install conda-pack -c conda-forge

# Pack the environment by specifying the location it's stored.
# conda pack -p /PATH/TO/ORIGINAL_ENV_DIR/
conda pack -p /home/USER/.conda/envs/pytorch_22.12-py3

Collecting packages...
Packing environment to 'pytorch_22.12-py3.tar.gz'
[########################################] | 100% Completed |  11min 52.2s

# Create a new target directory for unpacking the environment.
# mkdir /PATH/TO/NEW_ENV_DIR/
mkdir $PROJECT/.conda_mlperf/pytorch_22.12-py3

# Unpack the environment into that target directory.
# tar -xzf ENV_NAME.tar.gz -C /PATH/TO/NEW_ENV_DIR/
tar -xzf pytorch_22.12-py3.tar.gz -C /home/USER/pytorch_22.12-py3

# Activate the environment
# conda activate /PATH/TO/NEW_ENV_DIR/
conda activate $PROJECT/.conda_mlperf/pytorch_22.12-py3

# Unpack the environment by cleaning-up the prefixes.
conda-unpack
Use different directories when needed
It is possible to have multiple directories for the different conda environments, and to use that to archive different environment configurations across time. This is similar to creating the .conda symlink from $HOME to $PROJECT as outlined in the "Storing your Anaconda environments" section of the PSC Anaconda documentation,
For example, if existing environments are not going to be used for a while, a new conda project could be created as a way to make sure those existing environments will be safe from any modifications.
Remember that the path names in the environments should not be changed. Thus the name used the first time should be kept unchanged over time, and names should be restored to their original when the directories have been renamed.
Example: Switch from an existing conda directory to a new one.
# Rename the old directory. This is the one that should be returned to the original directory name if needed.
mv $PROJECT/.conda $PROJECT/conda_OLD_PROJECT_NAME_ARCHIVE

# Create a new directory for conda under PROJECT.
mkdir $PROJECT/.conda
Another approach for using different directories is to specify a prefix to denote where in the filesystem a conda environment should be set.
# Specify a location for the environment
conda create --prefix /path/to/env PACKAGE1 PACKAGE2

# Example:
conda create --prefix ~/.conda/envs/MY_ENV jupyterlab=0.35 matplotlib=3.1 numpy

# Create an environment in a shared location. It would only be available to the owner by default.
conda create --prefix /ocean/group/conda_envs/GROUP_ENV jupyterlab=0.35 matplotlib=3.1 numpy
Create an environment in a shared location so it's available and writable to the team members.
# Identify the group to map the environment to.
groups

# Log in to that group, so all files and folders created this session get associated to it.
newgrp

# Set new files and directories as writable to the group. Add the same to ~/.bashrc for a lasting effect.
umask 002

# Create a base directory for the environment to be at.
mkdir /ocean/GROUP/conda_envs/

# Set sticky group permissions (s) for the environment directory.
chmod g+rwxs /ocean/GROUP/conda_envs/


# env is used for specifying the spec (packages recipe) file.
conda env create -f conda/keras-retinanet4_conda_env_export.yaml --prefix $PROJECT/conda_envs/GROUP_ENV
General dos and don’ts for conda
Please do:
- Use a compute node for the installation process, so you can make use of the bandwidth and the I/O available there, but be sure to request more than an hour for your session, so the progress is not lost if there are a lot of packages to install.
- Specify all packages at once when installing packages, so conda doesn't have to run the full set of compatibility validations multiple times.
- Make sure that the destination folder for the packages is set to use the $PROJECT disk space, as the home folder ($HOME) quota is low and the envs and the cache are big.
- Try to always use conda to install packages and not pip. Only use pip when conda is not an option for installing those required packages.
- Try to only use the default conda channel of the most popular and reputable ones. Install packages using pip if needed.
- Export the list of installed packages as soon as you confirm that an environment is working as expected. Set a mnemonic file name for that list, and save it in a secure place, in case you need to install the environment from PROJECT again.
- Consider renaming the conda directory to something else if you think an environment is not going to be used anymore, but you are not completely sure. Compress/tar the contents, in case you need them again at some point.
Please don't:
- Use additional conda channels unless you know they are trustworthy.
- Install packages unless you are going to use them.
- Create multiple copies of the same environment, or at least tar the directory so there are less files using the file system.
PSC has built some environments which provide a rich, unified, Anaconda-based environment for AI, Machine Learning, and Big Data applications. Each environment includes several popular AI/ML/BD packages, selected to work together well.
The AI environments are built for the GPU nodes on Bridges-2. Be sure to use one of the GPU partitions. See the Bridges-2 User Guide for information on Bridges-2 partitions and how to choose one to use.
See also:
- the python documentation, for a description of the ways to use python on Bridges-2
- the Anaconda modules, for information on creating, editing and storing anaconda environments on Bridges-2
Using the AI environments on Bridges-2
Typing module spider AI will list the available AI environments.
module spider AI

----------------------------------------------------------------------------
  AI:
----------------------------------------------------------------------------
    Description:
      TensorFlow 2.10.0 AI development environment

     Versions:
        AI/anaconda2-tf1.2019.10
        AI/anaconda3-tf1.2020.11
        AI/anaconda3-tf2.2020.11
        AI/pytorch_22.07-1.12-py3
        AI/pytorch_23.02-1.13.1-py3
        AI/tensorflow_22.07-2.8-py3
        AI/tensorflow_23.02-2.10.0-py3
Note that AI/anaconda2 environments use python2, while AI/anaconda3 environments use python3.
For additional help, type module help AI/package-version.
 module help AI/tensorflow_23.02-2.10.0-py3

---------- Module Specific Help for "AI/tensorflow_23.02-2.10.0-py3" -----------
TensorFlow 2.10.0
-----------------------------

Description
-----------
The modulefile AI/tensorflow_23.02-2.10.0-py3 provides a TensorFlow 2.10.0 devel
opment environment for Artificial Intelligence(AI)/Machine Learning(ML)/Big Data
(BD) on top of Python 3.

Module contents
---------------
Several popular libraries are included in this environment, such as:
    bokeh, matplotlib, mkl, numba, numpy, pandas, pillow, scikit-learn, theano,
tensorflow.

To check the full list of available packages in this environment, first activate
 it and then run the command
    conda list

* bokeh                     3.0.3
* cudnn                     8.2.1
.
.
.
See what the PSC defined AI environment contains
To see the full list of software included in a given environment, first load the module and activate the environment. Then type
conda list
Customize the PSC defined AI environment
If you need software that is not in the pre-built environment, you can create a new environment by cloning the PSC defined one and then customizing it. First load the module and activate the PSC defined environment, as above, then clone it with
conda create --name your-new-environment-name --clone $AI_ENV
Then you can activate the new environment and proceed with your customization.
Example
In this example, the user installs the h5py package in a new environment they are creating. Use the following commands.
Note:
- The
conda listcommand shows what packages are currently installed. Check to see if what you need is already available. The conda list command also shows the version number of the installed packages. - The
conda createcommand clones $AI_ENV to create a new environment. This can take a long time, so ask for an hour of time with theinteractcommand. - Here, the new environment is named clone-env-1, and is stored in the user's ocean directory. The --prefix flag names the full path to the where the environment will be stored. You can name the environment anything you like and store it in any directory you like.
interact -gpu -t 01:00:00
 module load AI    # loads the default AI module
 source activate $AI_ENV
 conda list
 conda create --name clone-env-1 --clone $AI_ENV
 conda activate clone-env-1
 conda install h5py
The conda install command will install the newest version of the package. If you want to install a version of the package not available in the public installations use the --revision option to the conda install command.
Containers are stand-alone packages that hold the software needed to create a very specific computing environment. If you need such a specialized environment, you can create your own container or use one that is already installed on Bridges-2. Multiple container types are supported on Bridges-2.
NIM containers
NVIDIA Inference Microservice (NIM) containers are specialized, API-ready containers designed to serve machine learning models via standard HTTP endpoints. NIM containers enable researchers to interact with large AI models (like AlphaFold or OpenFold) through simple API calls, without needing to manage software stacks, model weights, or environments.
- For a full list of supported NIM contaners, refer to the build.nvidia.com website.
- See the model details on the website for specific information on features and capabilities of each NIM container type.
- Note: We cannot guarantee that every NIM container listed will be compatible with Bridges-2 systems.
- Important: NIM containers are NOT supported on v100 nodes. These containers should only be run on h100 or l40s nodes.
- You can also run pre-configured NIM containers on Bridges-2 using Apptainer.
- All required container files and configuration scripts are centrally managed in:
-
/ocean/containers/nim/
Available NIM Containers for Bridges-2
Each NIM container has its own subdirectory and is designed to be turn-key.
Current options include:
- alphafold2: Predicts protein structures from amino acid sequences using the original AlphaFold2 model.
- alphafold2-multimer: Models protein complexes with multiple chains.
- openfold2: Open-source AlphaFold2 implementation with speed and transparency improvements.
- msa-search: Performs multiple sequence alignment using JackHMMER, producing inputs for AlphaFold-style models.
Directory Structure
With these “turn-key” packages, researchers can simply launch the server and start sending input data with minimal setup. Each NIM container has its own subdirectory containing the following files:
| File Name / Type | Definition |
| run.sbatch | Slurm batch script to launch the API server and automatically submit the client job. |
| nim_client.sbatch | Slurm job that waits for the server, reads input_queries.txt, and sends queries to the API. |
| input_queries.txt | Input data file containing one query per line to be sent to the API. |
| README.md | Usage guide tailored to Bridges-2. |
| <container>.sif | The Apptainer image for the NIM container. |
| cache/ | Pre-populated folder with model and runtime cache data. |
| run.sh | Optional, interactive script to launch the API server manually (non-Slurm process). |
| nim_client.py / nim_client.sh | Interactive clients for querying the API outside of Slurm. |
| Sample input / output files | Example files for testing or reference. |
Running a NIM Container in Batch Mode
- Log in to Bridges-2.
- Navigate to the container folder:
-
cd /ocean/containers/nim/
- Review the usage notes:
-
cat README.md
- Add the input data to be processed, one item per line, in:
-
input_queries.txt
- Run the workflow:
-
sbatch run.sbatch
Optional: Running a NIM Container Interactively
- Log in to Bridges-2.
- Navigate to the container folder:
-
cd /ocean/containers/nim/
- Review the usage notes:
-
cat README.md
- Start a Slurm job.
- Run the container:
-
bash run.sh
- In a separate terminal, run the client to query the API:
-
bash nim_client.sh
Sigularity containers
You can create a Singularity container, copy it to and then execute it on Bridges-2, where the container can use Bridges-2’s compute nodes and filesystems. In your container you can use any software required by your application: a different version of CentOS, a different Unix operating system, any software in any specific version needed. You can install your Singularity container without any intervention from PSC staff.
- See the PSC documentation on Singularity for more details on producing your own container and Singularity use on Bridges-2.
- See also Using Singularity containers for details on “Pulling and converting Docker containers to Singularity.”
Note: Bridges-2 may already have all the software you need. Before creating a container for your work, check the extensive list of software that has been installed on Bridges-2. While logged in to Bridges-2, you can also get a list of installed packages using the command:
module avail
If you need a package that is not available on Bridges-2 you can request that it be installed by emailing help@psc.edu. You can also install software packages in your own file spaces and, in some cases, we can provide assistance when requested.
Publicly available containers on Bridges-2
We have installed many containers from the NVIDIA GPU Cloud (NGC) on Bridges-2. These containers are fully optimized, GPU-accelerated environments for AI, machine learning and HPC. They can only be used on the Bridges-2 GPU nodes.
These include containers for:
- Caffe and Caffe2
- Microsoft Cognitive Toolkit
- DIGITS
- Inference Server
- MATLAB
- MXNet
- PyTorch
- Tensorflow
- TensorRT
- Theano
- Torch
See the PSC documentation on Singularity for more details on Singularity use on Bridges-2.
Models
Foundation models, also known as general-purpose models, are large AI models trained on broad datasets that can be adapted to a wide range of tasks. Pre-trained on massive amounts of data, they can capture general knowledge and patterns that can then be fine-tuned for specific applications. They serve as a foundational building block for various AI applications, including generative AI.
MOMENT model
- MOMENT is a family of open-source foundation models for general-purpose, time-series analysis.
- Link to the GutHub repository for the MOMENT foundation model
Model description
The MOMENT model is a modified T5 model using a Huggingface implementation. The pre-trained model weights are hosted on Huggingface:
- https://huggingface.co/AutonLab/MOMENT-1-large
- https://huggingface.co/AutonLab/MOMENT-1-base
- https://huggingface.co/AutonLab/MOMENT-1-small
PTB-XL Dataset
PTB-XL is a large, publicly-available electrocardiography (ECG) dataset. It is comprised of 21,837 12-lead, 10-second long ECG recordings collected from 18,885 patients. The ECG-waveform data was annotated by two cardiologists as a multi-label dataset, where diagnostic labels were further aggregated into super and subclasses. In the tutorial linked below, each 10 second ECG recording is classified into one of five SCP ECG classes: (1) Normal ECG, (2) Conduction Disturbance, (3) Myocardial Infarction, (4) Hypertrophy, and (5) ST/T change.
- The PTB-XL dataset is needed for running the finetuning demo and ptbxl_classification tutorial.
- A description of the data and ways to download the dataset can be found here: https://physionet.org/content/ptb-xl/1.0.3/
Environment and commands
You can create your own custom environment or follow the steps below to create a custom environment for the MOMENT model.
module load cuda/12.6.
source /jet/packages/AI/moment_25.05/.venv/bin/activate
# python3 -m ipykernel install --user --name moment --display-name moment  # For Jupyter Notebook
Running the tutorials
The tutorials are available in the MOMENT Github repository. To download the materials, use the command:
git clone https://github.com/moment-timeseries-foundation-model/moment.git
Model Inference Tutorials:
For the Jupyter notebook tutorials for model inference, follow the steps in the Bridges-2 user guide to run Jupyter notebooks with the OnDemand portal and load the custom environment into the Jupyter notebook.
- https://www.psc.edu/resources/bridges-2/user-guide#jupyter-hub
- https://www.psc.edu/resources/bridges-2/user-guide#custom-env
Launching the Jupyter notebook application and importing the custom conda environment to Jupyter notebook using ipykernel:
- First, make sure you have installed the ipykernel package to your conda environment (following the instructions above).
- Log into the Bridges-2 OnDemand web portal: https://ondemand.bridges2.psc.edu
- Start a jupyter notebook session by requesting at least one GPU (it is sufficient to run most of the tutorial for model inference with one NVIDIA V100 GPU).
- Once you open the tutorial jupyter notebook (e.g., moment/tutorials/forecasting.ipynb), click Kernel > Change Kernel… You should see the name of your custom anaconda environment. Select the custom environment to run the notebook with the loaded environment.

- You should be able to run the Jupyter notebook on GPUs with your custom environment.
Model Finetuning Tutorials:
To run the finetune_demo (moment/tutorials/finetune_demo), please follow these steps:
- Download the PTB-XL (instructions can be found here)
- Adjust the classification.sh and ds.yaml files so that the directory locations for dataset, cache, output, and number of GPUs (e.g., num_processes) …as such, are set up correctly.
- Note: For the “mixed_precision” value in classification.sh, bf16 is not supported for v100 and will need to be modified.
- For v100 nodes, we recommend using fp32 (not mixed precision), as fp16 causes loss underflow and overflow; If running on v100s nodes, multi-GPUs (at least four) are required.
- For h100 nodes, bf16 works fine; If running on h100s, one GPU is sufficient.
- For l40s nodes, bf16 works fine; If running on l40s nodes, one GPU is sufficient.
- Set up the environment following the instructions above, depending on your setup.
- Below are example commands for running an interactive session:
interact --partition GPU-shared --gres=gpu:h100-80:1 -t 1:00:00
module load cuda/12.6.1
source /jet/packages/AI/moment_25.05/.venv/bin/activate

cd $LOCAL
mkdir cache
rsync -aP /ocean/datasets/community/moment/ptb-xl-a-large-publicly-available-electrocardiography-dataset-1.0.3.zip .

git clone https://github.com/moment-timeseries-foundation-model/moment.git
unzip -q ptb-xl-a-large-publicly-available-electrocardiography-dataset-1.0.3.zip
cd moment

cp /opt/packages/AI/moment_25.05/classification.sh tutorials/finetune_demo/classification.sh
bash tutorials/finetune_demo/classification.sh
A community dataset space allows Bridges-2 users from different allocations to share data in a common space. Bridges-2 hosts both community (public) and private datasets, providing rapid access for individuals, collaborations and communities with appropriate protections.
You can ask that PSC install a community dataset on Bridges-2 by emailing the helpdesk at help@psc.edu.
These datasets are available to anyone with a Bridges-2 account:
2019nCoVR: 2019 Novel Coronavirus Resource
The 2019 Novel Coronavirus Resource concerns the outbreak of novel coronavirus in Wuhan, China since December 2019. For more details about the statistics, metadata, publications, and visualizations of the data, please visit https://ngdc.cncb.ac.cn/ncov/.
Available on Bridges-2 at /ocean/datasets/community/genomics/2019nCoVR.
AlphaFold
The AlphaFold protein structure database contains over 990,00 protein structure predictions for the human proteome and other key proteins of interest. For more information, see https://alphafold.ebi.ac.uk/.
Available on Bridges-2 at /ocean/datasets/community/alphafold.
CIFAR-10
The CIFAR-10 dataset is a subset of the 8 million tiny images dataset, which contains 60,000 images in ten classes. See https://www.cs.toronto.edu/~kriz/cifar.html for more details.
Available on Bridges-2 at /ocean/datasets/community/cifar.
COCO
COCO (Common Objects in Context) is a large scale image dataset designed for object detection, segmentation, person keypoints detection, stuff segmentation, and caption generation. Please visit http://cocodataset.org/ for more information on COCO, including details about the data, paper, and tutorials.
Available on Bridges-2 at /ocean/datasets/community/COCO.
CosmoFlow
CosmoFlow consists of data from around 10,000 cosmological N-body dark matter simulations. Anyone with a Bridges-2 allocation can use CosmoFlow data, but you must request access via the CosmoFlow request form.
Please visit the CosmoFlow site at https://portal.nersc.gov/project/m3363/ for more information about this dataset.
Available on Bridges-2 at /ocean/datasets/community/cosmoflow.
ImageNet
ImageNet is an image dataset organized according to WordNet hierarchy. See the ImageNet website for complete information.
Available on Bridges-2 at /ocean/datasets/community/imagenet.
MNIST
Dataset of handwritten digits used to train image processing systems.
Available on Bridges-2 at /ocean/datasets/community/mnist.
Natural Languge Tool Kit Data
NLTK comes with many corpora, toy grammars, trained models, etc. A complete list of the available data is posted at: http://nltk.org/nltk_data/.
Available on Bridges-2 at /ocean/datasets/community/nltk.
OpenWebText
Available on Bridges-2 at /ocean/datasets/community/openwebtext.
PREVENT-AD
The PREVENT-AD (Pre-symptomatic Evaluation of Experimental or Novel Treatments for Alzheimer Disease) cohort is composed of cognitively healthy participants over 55 years old, at risk of developing Alzheimer Disease (AD) as their parents and/or siblings were/are affected by the disease. These ‘at-risk’ participants have been followed for a naturalistic study of the presymptomatic phase of AD since 2011 using multimodal measurements of various disease indicators. Two clinical trials intended to test pharmaco-preventive agents have also been conducted. The PREVENT-AD research group is now releasing data openly with the intention to contribute to the community’s growing understanding of AD pathogenesis.
Available on Bridges-2 at /ocean/datasets/community/prevent_ad.
TCGA Images
Available on Bridges-2 at /ocean/datasets/community/tcga_images.
Genomics datasets
These datasets are available to anyone with an allocation on Bridges-2. They are stored under /ocean/datasets/community/genomics.
| Dataset | Access |
|---|---|
| AUGUSTUS | /ocean/datasets/community/genomics/AUGUSTUS/latest |
| BLAST | Accessed through the environment variable $BLAST_DATABASE after loading the BLAST module |
| CheckM | /ocean/datasets/community/genomics/checkm/latest |
| Dammit | /ocean/datasets/community/genomics/dammit |
| Homer | /ocean/datasets/community/genomics/homer |
| Kraken2 | /ocean/datasets/community/genomics/kraken2 |
| Pfam | /ocean/datasets/community/genomics/pfam |
| Prokka | Accessed through the environment variable $PROKKA_DATABASES after loading the Prokka module |
| Repbase | /ocean/datasets/community/genomics/repbase |
Bridges-2 hosts a number of gateways – web-based, domain-specific user interfaces to applications, functionality and resources that allow users to focus on their research rather than programming and submitting jobs. Gateways provide intuitive, easy-to-use interfaces to complex functionality and data-intensive workflows.
Gateways can manage large numbers of jobs and provide collaborative features, security constraints and provenance tracking, so that you can concentrate on your analyses instead of on the mechanics of accomplishing them.
Bridges-2 is designed for converged HPC + AI + Data. Its custom topology is optimized for data-centric HPC, AI, and HPDA (High Performance Data Analytics). An extremely flexible software environment along with community data collections and BDaaS (Big Data as a Service) provide the tools necessary for modern pioneering research. The data management system, Ocean, contains 15PB of usable storage.
Compute nodes
Bridges-2 has three types of compute nodes: “Regular Memory”, “Extreme Memory”, and GPU.
Regular Memory nodes
Regular Memory (RM) nodes provide extremely powerful general-purpose computing, pre- and post-processing, AI inferencing, and machine learning and data analytics. Most RM nodes contain 256GB of RAM, but 16 of them have 512GB.
| RM nodes | ||
|---|---|---|
| Number | 488 | 16 |
| CPU | 2 AMD EPYC 7742 CPUs 64 cores per CPU, 128 cores per node 2.25-3.40 GHz |
2 AMD EPYC 7742 CPUs 64 cores per CPU, 128 cores per node 2.25-3.40 GHz |
| RAM | 256GB | 512GB |
| Cache | 256MB L3, 8 memory channels | 256MB L3, 8 memory channels |
| Node-local storage | 3.84TB NVMe SSD | 3.84TB NVMe SSD |
| Network | Mellanox ConnectX-6-HDR Infiniband 200Gb/s Adapter | Mellanox ConnectX-6-HDR Infiniband 200Gb/s Adapter |
Extreme Memory nodes
Extreme Memory (EM) nodes provide 4TB of shared memory for statistics, graph analytics, genome sequence assembly, and other applications requiring a large amount of memory for which distributed-memory implementations are not available.
| EM nodes | |
|---|---|
| Number | 4 |
| CPU | 4 Intel Xeon Platinum 8260M “Cascade lake” CPUs 24 cores per CPU, 96 cores per node 2.40-3.90 GHz |
| RAM | 4TB, DDR4-2933 |
| Cache | 37.75MB LLC, 6 memory channels |
| Node-local storage | 7.68TB NVMe SSD |
| Network | Mellanox ConnectX-6-HDR Infiniband 200Gb/s Adapter |
GPU nodes
Bridges-2’s GPU nodes provide exceptional performance and scalability for deep learning and accelerated computing.
| GPU nodes | |||||
|---|---|---|---|---|---|
| Number | 10 | 3 | 24 | 9 | 1 |
| GPUs per node | 8 NVIDIA H100-80GB SXM5 | 8 NVIDIA L40S-48GB | 8 NVIDIA Tesla V100-32GB SXM2 | 8 NVIDIA V100-16GB | 16 NVIDIA Volta V100-32GB |
| GPU memory | 80 GB per GPU, 2TB/node | 1TB/node (32x32GB) | 32 GB per GPU 256GB total/node |
16GB per GPU 128GB total/node |
32GB per GPU 512GB total |
| CPUs | 2 Intel Xeon “Sapphire Rapids” 8470 CPUs, 52-cores, 2.0 – 3.8 GHz | 2 Intel Xeon 6740E CPUs, 96 cores, 2.4GHz | 2 Intel Xeon Gold 6248 “Cascade Lake” CPUs 20 cores per CPU, 40 cores per node, 2.50 – 3.90 GHz |
2 Intel Xeon Gold 6148 CPUs 20 cores per CPU , 40 cores per node, 2.4 – 3.7 GHz |
2 Intel Xeon Platinum 8168 24 cores per CPU, 48 cores total, 2.7 – 3.7 GHz |
| RAM | 128GB DDR5-4800 DIMM, 2,048 GB system memory | 1024GB | 512GB, DDR4-2933 | 192 GB, DDR4-2666 | 1.5 TB, DDR4-2666 |
| Interconnect | NVLink | PCIe | NVLink | PCIe | NVLink |
| NVCache | 27.5MB LLC, 6 memory channels | 33MB | |||
| Node-local storage | 4 NVMe SSDs (7.68 TB total) | 8 EDSFF NVMe drives (3.2TB ) | 7.68TB NVMe SSD | 4 NVMe SSDs, 2TB each (total 8TB) | 8 NVMe SSDs, 8.84TB each (total ~30TB) |
| Network | Infiniband 900 GB | 2 HDR InfiniBand adapters | 2 Mellanox ConnectX-6 HDR Infiniband 200 Gbs/s Adapters | ||
Data management
Data management on Bridges-2 is accomplished through a unified, high performance filesystem for active project data, archive, and resilience, named Ocean.
Ocean, used for active project data, is a high performance, internally resilient Lustre parallel filesystem with 15PB of usable capacity, configured to deliver up to 129GB/s and 142GB/s of read and write bandwidth, respectively.
All publications, copyrighted or not, resulting from an allocation of computing time on Bridges-2 should include an acknowledgement. Please acknowledge both the funding source that supported your access to PSC and the specific PSC resources that you used.
Please also acknowledge support provided by PSC staff and/or XSEDE’s ECSS program when appropriate.
Proper acknowledgment is critical for our ability to solicit continued funding to support these projects and next generation hardware.
Suggested text and citations follow.
Bridges-2 paper
Please include this citation:
Brown, S. T., Buitrago, P., Hanna, E., Sanielevici, S., Scibek, R., & Nystrom, N. A. (2021). Bridges-2: A Platform for Rapidly-Evolving and Data Intensive Research. In Practice and Experience in Advanced Research Computing (pp. 1-4). doi: 10.1145/3437359.3465593
ACCESS supported research on Bridges-2, for activities after August 31, 2022
We ask that you use the following text:
This work used Bridges-2 at Pittsburgh Supercomputing Center through allocation [allocation number] from the Advanced Cyberinfrastructure Coordination Ecosystem: Services & Support (ACCESS) program, which is supported by National Science Foundation grants #2138259, #2138286, #2138307, #2137603, and #2138296.
XSEDE supported research on Bridges-2, for activities prior to September 1, 2022
We ask that you use the following text:
This work used the Extreme Science and Engineering Discovery Environment (XSEDE), which is supported by National Science Foundation grant number ACI-1548562. Specifically, it used the Bridges-2 system, which is supported by NSF award number ACI-1928147, at the Pittsburgh Supercomputing Center (PSC).
Please also include this citation:
Towns, J., Cockerill, T., Dahan, M., Foster, I., Gaither, K., Grimshaw, A., Hazlewood, V., Lathrop, S., Lifka, D., Peterson, G.D., Roskies, R., Scott, J.R. and Wilkens-Diehr, N. 2014. XSEDE: Accelerating Scientific Discovery. Computing in Science & Engineering. 16(5):62-74. http://doi.ieeecomputersociety.org/10.1109/MCSE.2014.80.
Research on Bridges-2 not supported by XSEDE or ACCESS
For research on Bridges-2 supported by programs other than XSEDE or ACCESS, we ask that you use the following text:
This work used the Bridges-2 system, which is supported by NSF award number OAC-1928147 at the Pittsburgh Supercomputing Center (PSC).
PSC support
Please also acknowledge any support provided by PSC staff.
If PSC staff contributed substantially to software development, optimization, or other aspects of the research, they should be considered as coauthors.
When PSC staff contributions do not warrant coauthorship, please acknowledge their support with the following text:
We thank [consultant name(s)] for [his/her/their] assistance with [describe tasks such as porting code, optimization, visualization, etc.]
XSEDE ECSS support
To acknowledge support provided through XSEDE’s Extended Collaborative Support Services (ECSS), please use this text:
We thank [consultant name(s)] for [his/her/their] assistance with [describe tasks such as porting code, optimization, visualization, etc.], which was made possible through the XSEDE Extended Collaborative Support Service (ECSS) program.
Please include this citation:
Wilkins-Diehr, N and S Sanielevici, J Alameda, J Cazes, L Crosby, M Pierce, R Roskies. High Performance Computer Applications 6th International Conference, ISUM 2015, Mexico City, Mexico, March 9-13, 2015, Revised Selected Papers Gitler, Isidoro, Klapp, Jaime (Eds.) Springer International Publishing. ISBN 978-3-319-32243-8, 3-13, 2016. 10.1007/978-3-319-32243-8.
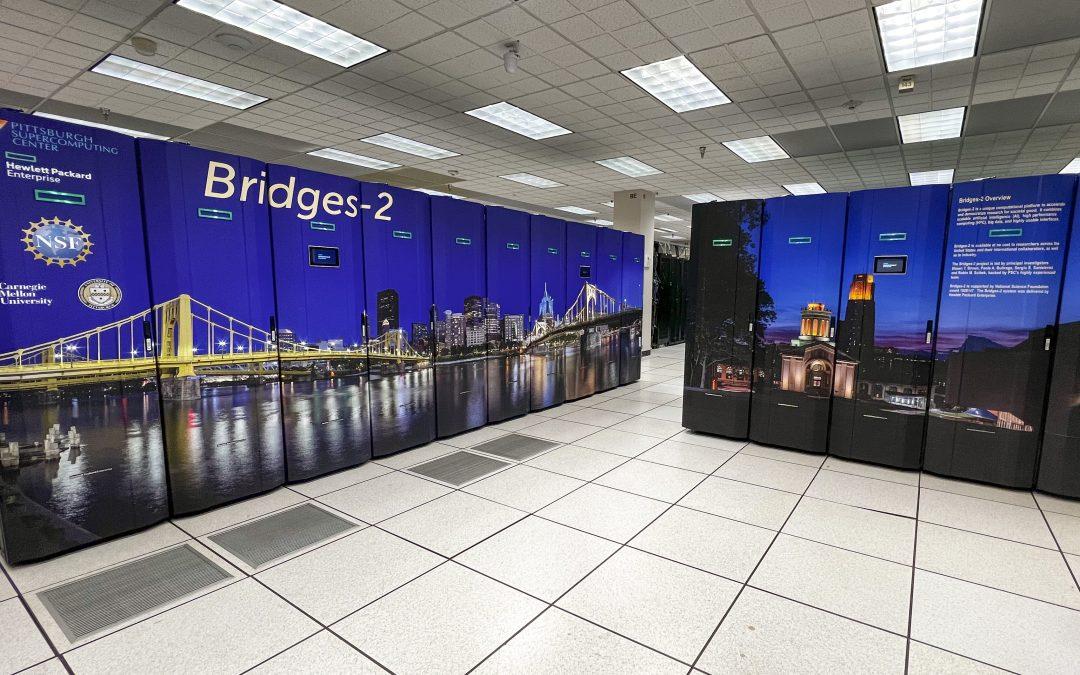
HPN-SSH Now the Default SSH on Bridges-2 DTNs
HPN-SSH (High-Performance Networking SSH) is now the default implementation of SSH on Bridges2...
New Nodes Added to Bridges-2
PSC is pleased to announce that the Bridges-2 team just added three (3) additional nodes to...