VisIt
VisIt is an interactive and scalable visualization, animation and analysis tool. You can quickly generate visualizations from your data, animate them through time, manipulate them, and save the resulting images for presentations. VisIt contains a rich set of visualization features so that you can view your data in a variety of ways. It can be used to visualize scalar and vector fields defined on two- and three-dimensional (2D and 3D) structured and unstructured meshes. VisIt was designed to handle very large data set sizes in the peta-scale range and yet can also handle small data sets in the kilobyte range.
Documentation
Usage on Bridges-2
Command Line Interface
The command line interface (CLI) and tools are available for for VisIt for interactive and batch use through the loading the module.
Type module load visit to add the tools to your path.
Remote Client Usage
You do not need to load the visit module. The visit module does not actually change your environment, since VisIt is normally used remotely via a copy of the VisIt software on your local machine.
Type module help visit for instructions on configuring VisIt on your local machine to connect to Bridges-2.
Once these settings in place you should be able to select bridges.psc.edu as Host in the File/open menu to visualize your Bridges data directly
You must install VisIt on your local computer. Once this is done, you will need to set up Bridges-2 as a Host and define a Launch Profile before you can begin to use VisIt to generate visualizations. Instructions for both steps are below, as is a simple tutorial.
Set up Bridges-2 as a host
The connection from your local system to Bridges-2 is accomplished through SSH-Tunneling. Optionally, you can set up SSH Keys for passwordless login to Bridges-2. See the SSH description in the Connecting to Bridges-2 section of the Bridges-2 User Guide for instructions. However, you will still be able to use your password if you prefer.
Open VisIt on your local machine. From the top menu select Options > Host Profiles. A new window will open.
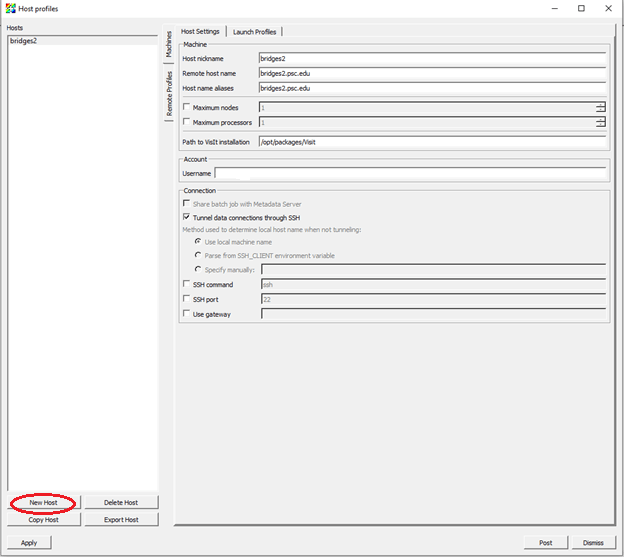
Click the New Host button.
Enter the following values as shown in the image:
Host nickname: bridges2
Remote host name: bridges2.psc.edu
Host name alias: bridges2.psc.edu
Path to VisIT installation: /opt/packages/Visit
Username: enter your Bridges-2 username
Check:
Tunnel data connections through SSH
Use local machine name
Accept the other defaults.
Define a Launch Profile
For our purposes, we will define a profile that will run on one node of Bridges-2. Click on the Launch Profiles tab at the top and you will see a window like below.
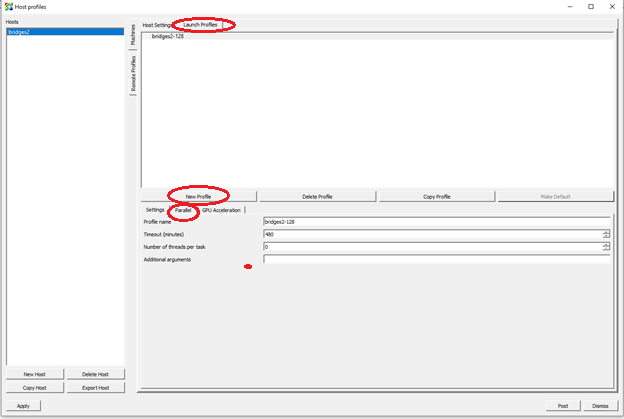
In the large window in this screen, change Profile name to bridges2-128.
In the Timeout (minutes) field, enter 400.
In the Number of threads per task field, enter 0.
Click the Parallel tab.
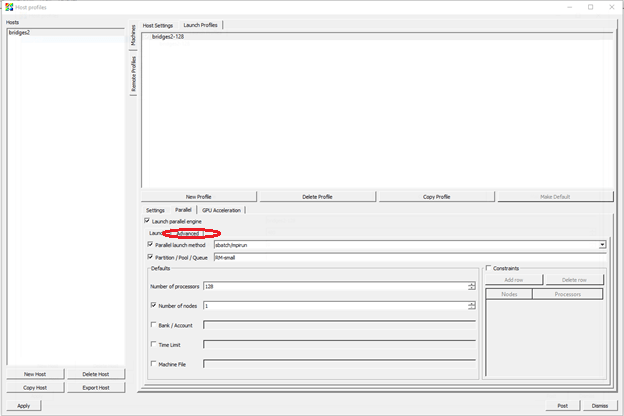
In this screen:
Check Launch parallel engine.
Check Parallel launch method and enter sbatch/mpirun in the text box.
Check Partition/Pool/Queue and enter RM-small in the text box.
Enter 128 for Number of processors
Check Number of nodes and enter 1 in the text box
When this is done, click the Advanced tab.
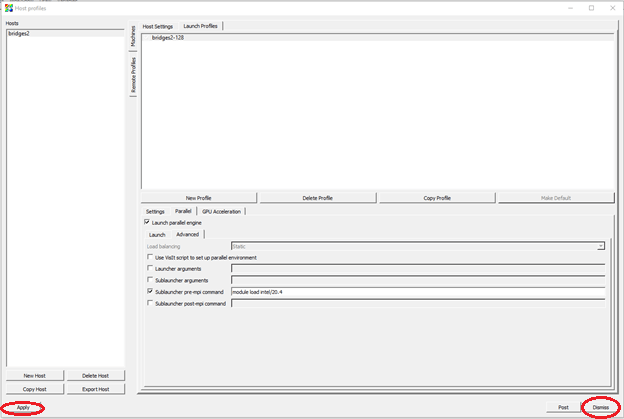
In this screen:
Check Launch parallel engine
Check Sublauncher pre-mpi command and enter module load intelmpi/20.4-intel20.4 in the text field.
Click Apply
Click Dismiss
Important: From the top menu select Options > Save settings.
Test your connection to Bridges-2
Once the setup is completed, test that you can make a successful connection to Bridges-2.
From the top menu select File > Open.
You will see a new dialog window.
In the Host field select bridges2 from the dropdown menu.
VisIt will now attempt to connect to Bridges-2 and may ask you for your password. If all goes well, you should see the directories from your Bridges-2 home directory available to explore. Select the data you want to work with and you should be on your way.
Tutorial Example – Rendering the volume of a human skull
This example visualization will open and render a visualization of a human skull. Start VisIT on your local system.
- Select File > Open from the top menu .
- Select “bridges2.psc.edu” in the Host dropdown menu and connect to Bridges-2 (you may have to enter your password).
- Once connected to Bridges-2, the Path field should be the path to your home directory. The Directories and Files fields should display the contents of your home directory. Change the Path field to be “/opt/packages/Visit/data/tutorials”.
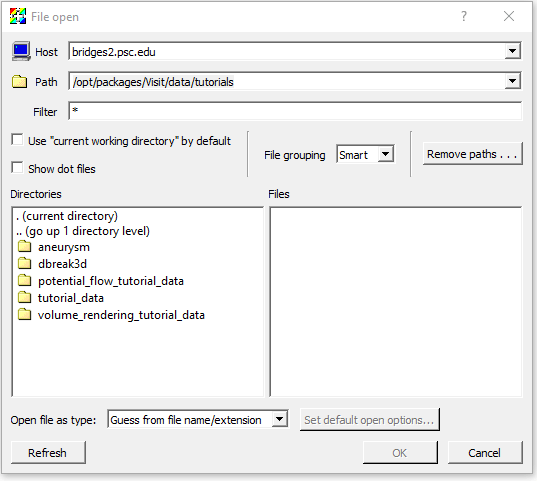
Your screen should look like this if all has gone well.
- Double-click the “volume_rendering_tutorial_data” folder under Directories.
- Double-click on the “CThead_mid.silo” file under Files.
The dialog box should close and another dialog should appear (in Windows, look at the toolbar at the bottom to potentially find it) which shows Select options for ‘bridges2.psc.edu’. If you have already setup a node exclusive Launcher for Bridges-2, that should appear in the box. (In the setup instructions above we named it “bridges2-128″). - Click on the name of the node exclusive launcher you set up.
- Click OK.
A new dialog entitled “compute engine launch box” will appear while VisIt connects to Bridges-2 and attempts to request resources. Note: this step could take a while depending on how busy Bridges-2 currently is.
Once the data is loaded and you have resources on Bridges-2, it is time to render the data. In the main VisIt window, the Active source field should now show the “CThead_mid.silo” data set. Below that should be a section labelled Plots. - Click the Add button there.
- Select Volume > head from the menu that appears. In the text box under Plots you should see a new entry called “Volume – head”, just as below.
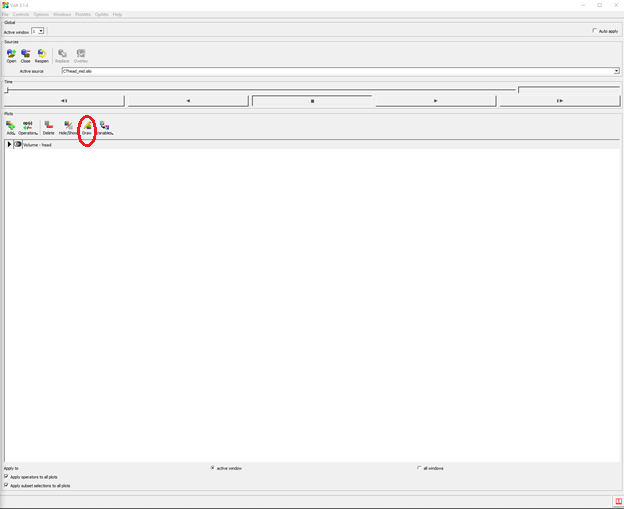
- The Draw button should be active. Click on it.
In the viewer window, a new image as below should appear.
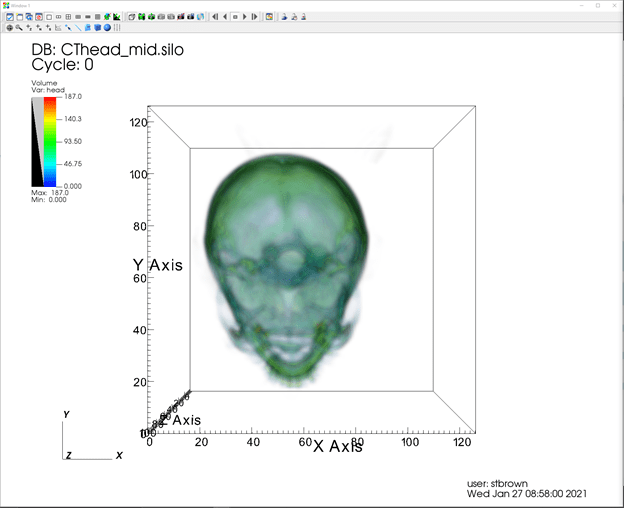
This completes the VisIt Tutorial. You are ready to go utilize the powerful features of VisIt remotely on Bridges-2.
If you have any problems, please contact help@psc.edu.
