
Using Jupyter Notebooks on Bridges-2
This document explains how to run a Jupyter notebook on Bridges-2 using a Jupyter client on your local machine. You can also run Jupyter on Bridges-2 through the OnDemand web interface. See the OnDemand section of the Bridges-2 User Guide for more information on using Jupyter through OnDemand.
Follow the steps below to run a Jupyter notebook on Bridges-2 using a Jupyter client on your local machine.
1. Login to Bridges-2
Connect to Bridges-2 via ssh or gissh. For more information, see the Connecting to Bridges-2 section of the Bridges-2 User Guide.
2. Load an anaconda module to put the latest version of anaconda and Jupyter in your path
To see what anaconda modules are available, use the module spider command:
[user@bridges2-login012 ~]$ module spider anaconda
----------------------------------------------------------------------------
  anaconda2: anaconda2/2019.10
----------------------------------------------------------------------------
    Description:
      Anaconda is a free and open-source distribution of the Python and R
      programming languages for scientific computing, that aims to simplify
      package management and deployment. Package versions are managed by
      the package management system conda.


    This module can be loaded directly: module load anaconda2/2019.10

    Help:
      Anaconda is a free and open-source distribution of the Python and R
      programming languages for scientific computing, that aims to simplify
      package management and deployment. Package versions are managed by the
      package management system conda.


----------------------------------------------------------------------------
  anaconda3:
----------------------------------------------------------------------------
    Description:
      Anaconda is a free and open-source distribution of the Python and R
      programming languages for scientific computing, that aims to simplify
      package management and deployment. Package versions are managed by
      the package management system conda.

     Versions:
        anaconda3/2020.07
        anaconda3/2020.11

----------------------------------------------------------------------------
  For detailed information about a specific "anaconda3" package (including how t
o load the modules) use the module's full name.
  Note that names that have a trailing (E) are extensions provided by other modules.
  For example:

     $ module spider anaconda3/2020.11
----------------------------------------------------------------------------

[user@bridges2-login012 ~]$
When you have identified the module that you want, load it by typing
module load module-name
3. Double check the versions of python and Jupyter
Use the –version flag with the jupyter and python commnds to be sure that you are using the versions of Jupyter and python that you expect.
[user@bridges2-login012 ~]$ jupyter --version
jupyter core     : 4.6.3
jupyter-notebook : 6.1.4
qtconsole        : 4.7.7
ipython          : 7.19.0
ipykernel        : 5.3.4
jupyter client   : 6.1.7
jupyter lab      : 2.2.6
nbconvert        : 6.0.7
ipywidgets       : 7.5.1
nbformat         : 5.0.8
traitlets        : 5.0.5
[user@bridges2-login012 ~]$ python --version
Python 3.8.5
[user@bridges2-login012 ~]$
4. Get a Bridges-2 compute node allocated for your use
Get a Bridges-2 compute node allocated for you by using the interact command. See the Running jobs section of the Bridges-2 User Guide for more information on the interact command and the options available. You may have to wait for nodes to be allocated to you. This interact command asks for one node, and 4 cores on that node. You can vary the number of nodes and cores as needed.
$ interact -N 1 -n 4
  A command prompt will appear when your session begins
 "Ctrl+d" or "exit" will end your session
  [user@r001 ~]$
5. Find the hostname of the node you are running on
You will need the hostname when you are mapping a port on your local machine to the port on Bridges-2 compute node. Find the hostname of the node you are on from the prompt, or type the hostname command.
[user@r001 ~]$ hostname
r001.ib.bridges2.psc.edu
[user@r001 ~]$
6. Start a Jupyter notebook and find the port number and token
Start a Jupyter notebook. From the output of that command, find the port that you are running on and your token. Pay attention to the port number you are given. You will need it to make the connection between the compute node and your local machine.
The port number Jupyter uses on the compute node can be different each time a notebook is started. Jupyter will attempt first to use port 8888, but if it is taken – by a different Jupyter user for example – it increases the port number by one and tries again, and repeats this until it finds a free port. The one it settles on is the one it will report.
$ jupyter notebook --no-browser --ip=0.0.0.0
[I 10:40:03.543 NotebookApp] JupyterLab extension loaded from /opt/packages/anaconda3/lib/python3.8/site-packages/jupyterlab
[I 10:40:03.543 NotebookApp] JupyterLab application directory is /opt/packages/anaconda3/share/jupyter/lab
[I 10:40:03.545 NotebookApp] Serving notebooks from local directory: /jet/home/user
[I 10:40:03.545 NotebookApp] Jupyter Notebook 6.1.4 is running at:
[I 10:40:03.545 NotebookApp] http://r001.ib.bridges2.psc.edu:8889/?token=cd3618a1655ff19783fb38a87ccbe7fa5bac8b09c7888e91
[I 10:40:03.545 NotebookApp]  or http://127.0.0.1:8889/?token=cd3618a1655ff19783fb38a87ccbe7fa5bac8b09c7888e91
[I 10:40:03.545 NotebookApp] Use Control-C to stop this server and shut down all kernels (twice to skip confirmation).
[C 10:40:03.550 NotebookApp]

    To access the notebook, open this file in a browser:
        file:///jet/home/user/.local/share/jupyter/runtime/nbserver-60525-open.html
    Or copy and paste one of these URLs:
        http://r001.ib.bridges2.psc.edu:8889/?token=cd3618a1655ff19783fb38a87ccbe7fa5bac8b09c7888e91
     or http://127.0.0.1:8888/?token=cd3618a1655ff19783fb38a87ccbe7fa5bac8b09c7888e91
In this case, the port number you have been given on the compute node is 8889.
7. Map a port on your local machine to the port Jupyter is using on the Bridges-2 compute node
Use a second connection to Bridges-2 to map the port 8888 in your local machine to the port you are using (8889 in this example) on the compute node. This is a bit of the chicken-and-the-egg situation: if you knew what node and what port you would end up on, you could have done the mapping on the first connection. But there is no way to know that a-priori.
The process to do this will be different on a Windows machine than on a Mac or Linux machine.
On a Windows machine
You will need to set up an additional ssh connection to Bridges-2 with tunneling, using the ssh client that you have installed. Instructions for doing this with the PuTTY client are given here.
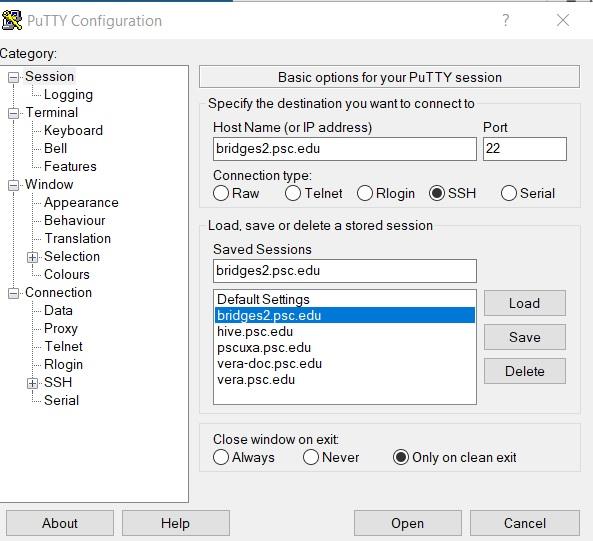 Open PuTTY. Type
 bridges2.psc.eduinto the HostName field (or select it from your Saved Sessions) and click Load.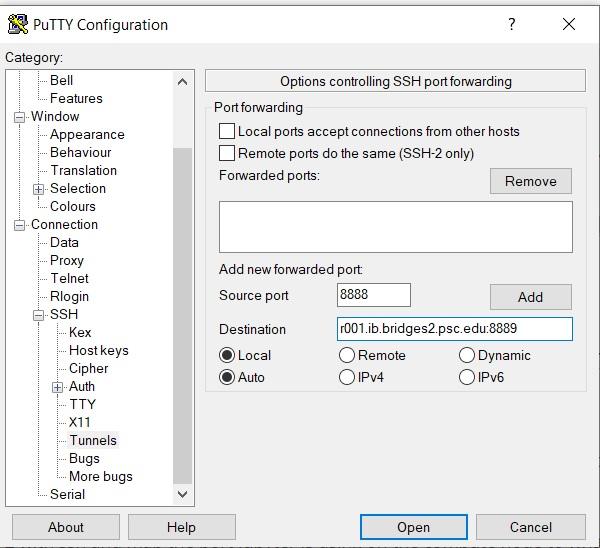 From the left side menu, choose Connection > SSH >Tunnels.
- Type
8888in the Source port field (this is the port number on your local machine) - Enter the remote hostname and port number (from step 6 above) into the Destination field. The format is compute-host-name:compute-node-port. In this example, the string is r001.ib.bridges2.psc.edu:8889.
- Click Add.
- Type
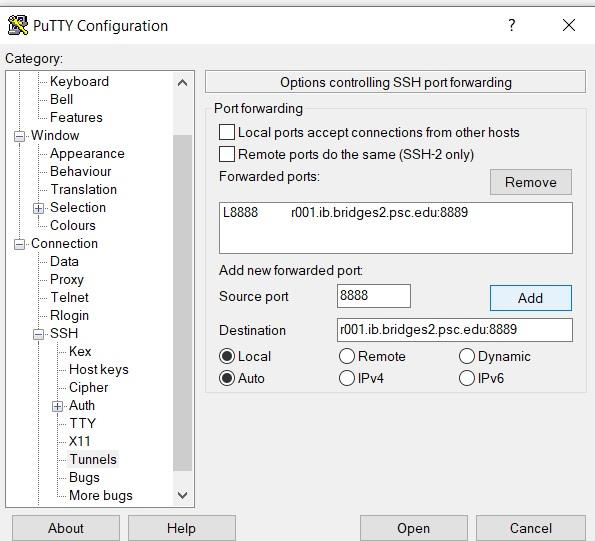 The connection shows up in the Forwarded ports field. Go to step 8, “Open a browser window to connect to the Jupyter server”.
On a Mac or Linux machine
On a separate shell, connect to Bridges-2 with ssh and map the port Jupyter is using on the compute node to whatever port you like on the localhost. The format of this command is:
ssh -L local-port:compute-host-name:compute-node-port bridges2.psc.edu -l username
You must use the correct compute node name and port that you have been allocated. In this case, because you were connected to port 8889 on compute node r001, that command would look like:
$ ssh -L 8888:r001.ib.bridges2.psc.edu:8889 bridges2.psc.edu -l username
Here the localhost port is “8888”. After the first “:” comes the long name of the compute node, a colon, and the port where Jupyter is running. Here, that string is “r001.ib.bridges2.psc.edu:8889”.
Note that even though the port on the compute node is 8889 in this case, we still use local port 8888 as usual.
8. Open a browser window to connect to the Jupyter server
On your local machine, open a browser and point it to http://localhost:8888. You will be prompted to enter a token to make the connection. Use the token given to when you started the Jupyter server on the Bridges-2 compute node (step 6 above).
9. When you are done, close your interactive session on Bridges-2
Your allocation will be incurring SUs for the entire time that you are connected to your interactive session on the Bridges-2 compute node. When you are finished, don’t forget to return to the Bridges-2 interactive session and end the Jupyter server with Control-C, and then end your interactive session by typing exit.